
 DANIELZGOMBIC/ISTOCK/GETTY IMAGES PLUS
Optimizing Esthetics With a Single Veneer
Following conservative esthetic principles, this clinical report details the use of a feldspathic porcelain veneer to restore a single maxillary lateral incisor.
Esthetic dental procedures involving restoration of a single anterior tooth pose a challenge for dentists and lab technicians. To mitigate this challenge, clinicians may opt to restore all anterior teeth, but this would not be the most conservative approach. The following clinical report highlights a case in which a single maxillary lateral incisor was restored using a feldspathic porcelain veneer following orthodontic treatment. This course of treatment was chosen in an effort to remain conservative and address the patient’s chief complaint, but without the need to remove otherwise healthy tooth structure on adjacent teeth.
Shade selection can be difficult due to the varying degrees of hue, chroma and value, as well as the environment in which these factors are analyzed.1 Traditionally this has been completed with a visual method that employs shade tabs. More contemporary systems include spectrophotometers, colorimeters and imaging systems.2 Studies have shown these systems are more repeatable compared to the human eye, with a day-to-day repeatability of up to 83%.3
In addition, digital photography and cross-polarizing filters provide valuable information regarding variations in the shade and value of natural teeth. Cross-polarized photography uses two linear polarizing filters, both rotated 90 degrees to the other, to produce an image with little to no light interference. This technique allows for a better interpretation of the characteristics, transparencies and details of tooth structure.2,3
In this case involving a single anterior feldspathic porcelain veneer, communication with the laboratory technician included a diagnostic wax-up and cross-polarized photography to aid in replicating anatomy and the selected tooth shade.
CLINICAL REPORT
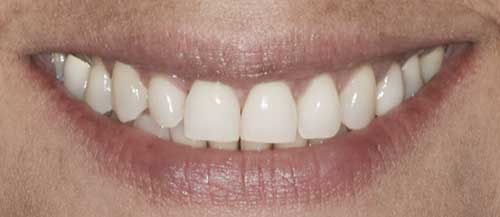
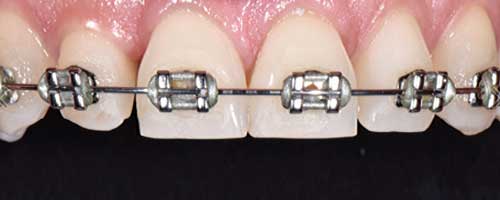
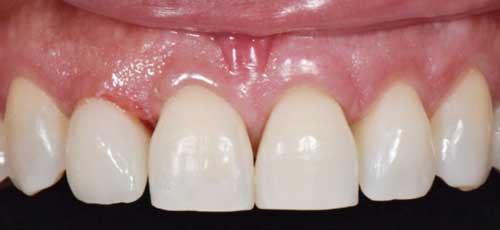
A 43-year-old female was referred to the advanced education in general dentistry (AEGD) clinic at the Dental College of Georgia at Augusta University for restorative options to close a diastema and enhance the esthetic appearance of her maxillary right lateral incisor following limited orthodontic treatment. A photograph of her smile prior to orthodontic treatment was shared by the orthodontist (Figure 1). The patient’s chief complaint was that she “did not like this little tooth and the space.” The patient had just completed nine months of limited orthodontic treatment to correct the previously malpositioned, rotated maxillary right lateral incisor. Examination upon referral to the AEGD clinic revealed a diastema between teeth #7 and 8, a short clinical crown on tooth #7, as well as a gingival margin that was lower than that of the contralateral side (Figure 2).
Options for both composite resin veneer and porcelain veneer restorations were presented to the patient, along with esthetic crown lengthening in order to achieve symmetrical gingival margins. The patient chose the porcelain veneer treatment option and declined the surgical procedure.
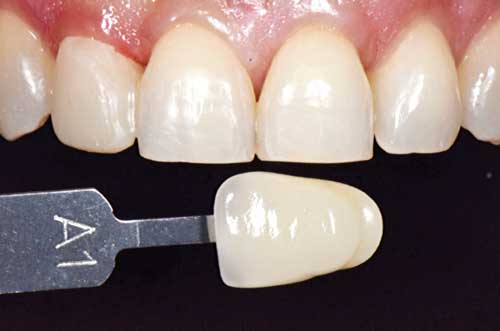
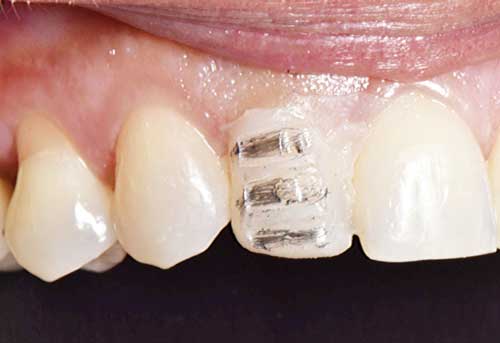
Upon completion of orthodontic treatment, an alginate impression was made and a diagnostic wax-up completed to use when correcting the line angles and closing the diastema. A mock-up using bis-acryl resin was completed to allow the patient to visualize the new contours and obtain her approval. A basic shade was selected using the VITA classic shade tab (Figure 3). Local anesthetic (1.8 ml of 2% lidocaine with 1:100,000 epinephrine) was administered via infiltration, and a triple zero retraction cord was placed. Depth cutting marks were placed directly onto the mock-up (Figure 4) using a 0.3 mm barrel-type diamond bur. Next, the mock-up was removed and an assessment was made regarding the amount of reduction needed. The completed conservative preparation can be seen in Figure 5.
After a polyvinyl siloxane impression was obtained, a provisional restoration was fabricated using bis-acryl and delivered using the spot-etch technique in combination with a flowable composite. Cross-polarized photographs were obtained of teeth #6, 7 and 8 (Figure 6) to aid in communication with the dental technician. The prescription requested a feldspathic porcelain veneer with similar anatomy as that of tooth #10, duplicating the incisal third halo effect, as seen on tooth #8.
DELIVERY APPOINTMENT
The patient returned six weeks later for delivery. Surface treatment of the ceramic was carried out in the laboratory using hydrofluoric acid. During the delivery appointment, the intaglio surface was cleaned with 37% phosphoric acid for 60 seconds, and the restoration was placed in the ultrasonic cleaner for five minutes before one layer of tri-functional primer was applied. After administration of the local anesthetic (1.8 ml of 2% lidocaine with 1:100,000 epinephrine), knitted cord was placed in the sulcus, the provisional restoration was removed, and the veneer fitted using clear try-in gel. No adjustments were needed, and the patient was satisfied with the shade and appearance.

At this point, rubber dam isolation was accomplished using a B4 clamp and stabilizing cords, and polytetrafluoroethylene tape was placed on the adjacent teeth to protect them from the etchant material. The facial and interproximal surfaces were etched with 37% phosphoric acid for 15 seconds, after which adhesive was applied and light cured. Clear adhesive resin cement was applied on the intaglio surface of the restoration, and manipulated with a composite instrument to make sure it covered all areas. The restoration was seated (Figure 7) and tack-cured on both the facial and lingual surfaces for three seconds prior to removing excess cement. An additional 20 seconds of light-cure polymerization was completed from all angles. After rubber dam removal, remaining excess cement was removed using a #12 blade. Photos were obtained immediately after delivery (Figure 8), as well as three months postoperatively (Figure 9).

DISCUSSION
This case required an interdisciplinary approach to meet patient expectations and remain conservative. Completing orthodontic treatment alone would not have addressed the patient’s concern regarding length and width of the lateral incisor. Following orthodontic treatment, the tooth in question was positioned in the ideal location to allow for a conservative restorative approach. The orthodontic treatment achieved a more ideal position of tooth #7, but the restorative approach was necessary to close the diastema and add length to the incisal edge.
It has been well documented3,4 that color communication is best when using digital photography and shade tabs from the available shade guides. When properly calibrated, digital cameras are reliable instruments for color determination.4 In comparison to other shade selection instruments, such as colorimeters and spectrophotometers, cross-polarization filters are more cost-efficient, making them an ideal tool to be utilized in general dental practice.5 These more advanced instruments have some limitations, as well. All of these instruments have been developed to match the visual response of the observer. Any mismatch could result in an incorrect level of hue, value or chroma.

Because feldspathic porcelain has a high degree of translucency, it can be used with minimal thickness to replicate natural tooth structure (as long as there is no dark dentin or a stark difference in the stump shade).6,7 Research supports the use of this material for laminate veneers, with a survival rate of 90% over 10 years.8 This material allows for a minimally invasive preparation (less than 0.5 mm tooth reduction),9 which maximizes the remaining enamel for optimal bonding, protects the gingival tissues, and prevents over-contouring of the final restoration.10 Utilizing the mock-up as a reduction guide helps determine the amount of reduction necessary relative to the position of the future restoration. In this case, the preparation remained entirely in the enamel (Figure 5). Studies show that increased enamel thickness dramatically increases the load needed to cause a terminal catastrophic fracture in the porcelain.10,11
As this restorative material requires a skilled ceramist, clear communication between the clinician and lab technician is imperative. The diagnostic wax-up provided valuable information for the lab technician for the basic shape of the final restoration since this was also used for the mock-up that had already been approved by the patient. Multiple photographs of the adjacent teeth, shade, and surface texture were also shared. The lab technician was given a contrasted, cross-polarized photograph, which afforded the opportunity to replicate the opaque and translucent effects seen on the neighboring teeth during layering of the feldspathic porcelain.

CONCLUSION
To meet the high esthetic demands of today’s patients, clinicians must consider materials that mimic the natural dentition and provide enhanced esthetics. Additionally, effective communication between the dentist and ceramist is critical in ensuring satisfactory outcomes. In this case, after shade matching with the VITA shade guide yielded a selection of A1, photographs in color, black and white, and cross-polarized were obtained to communicate the desired shade to the laboratory technician.
This case report not only illustrates a successful approach to an esthetic challenge, it also demonstrates adherence to the principles of conservative dentistry — preparing a single tooth instead of additional teeth to obtain the desired esthetics.
Key Takeaways
- Esthetically, restoring a single anterior tooth poses challenges for dentists and ceramists, who must strive to match tooth anatomy and shade.
- Shade selection can be difficult due to the varying degrees of hue, chroma and value, as well as the environment in which these factors are analyzed.1
- Traditionally this has been completed with a visual method that employs shade tabs, while more contemporary systems include spectrophotometers, colorimeters and imaging systems.2
- Digital photography and cross-polarizing filters can also provide valuable information regarding variations in the shade and value of natural teeth.
- Cross-polarized photography uses two linear polarizing filters, both rotated 90 degrees to the other, to produce an image with little to no light interference.
- The cross-polarized technique allows for better interpretation of the characteristics, transparencies and details of tooth structure.2,3
- This report details the use of a single anterior feldspathic porcelain veneer, and the clinical team’s communication with the laboratory included a diagnostic wax-up and cross-polarized photography to aid in replicating anatomy and the selected shade.
- As the fabrication of an anterior feldspathic porcelain veneer requires a skilled ceramist, effective communication between clinicians and the lab is imperative in order to successfully replicate the opaque and translucent effects seen on neighboring teeth.
References
- Christensen GJ. Restoring a single anterior tooth: solutions to a dental dilemma. J Am Dent Assoc. 2004;135:1725–1727.
- Chu SJ, Trushkowsky RD, Paravina RD. Dental color matching instruments and systems. Review of clinical and research aspects. J Dent. 2010;38(Suppl 2):e2–e16.
- Stevenson B. Current methods of shade matching in dentistry: a review of the supporting literature. Dent Update. 2009;36:270–272, 274–276.
- Villavicencio-Espinoza CA, Narimatsu MH, Furuse AY. Using cross-polarized photography as a guide for selecting resin composite shade. Oper Dent. 2018;43:113–120.
- Kahng LS. Material selection and shade matching for a single central incisor. J Cosmet Dent. 2006;22:78–84.
- McLaren EA, LeSage B. Feldspathic veneers: what are their indications? Compend Contin Educ Dent. 2011;32:44–49.
- Soares PV, Duarte LD, Moura GF, Zeola LF, Pereira AG, Machado AC. Esthetic rehabilitation with minimally invasive feldspathic ceramic veneers: 30 months of clinical follow-up. Biosci J. 2016;32:1428–1434.
- Morimoto S, Albanesi RB, Sesma N, Agra CM, Braga MM. Main clinical outcomes of feldspathic porcelain and glass-ceramic laminate veneers: A systematic review and meta-analysis of survival and complication rates. Int J Prosthodont. 2016;29:38–49.
- Federizzi L, Gomes EA, Báratro SSP, Baratto-Filho F, Bacchi A, Spazzin AO. Use of feldspathic porcelain veneers to improve smile harmony: A 3-year follow-up report. Braz Dent J. 2016;27:767–774.
- Ge C, Green CC, Sederstrom DA, McLaren EA, Chalfant JA, White SN. Effect of tooth substrate and porcelain thickness on porcelain veneer failure loads in vitro. J Prosthet Dent. 2018;120:85–91.
- Gurel G, Sesma N, Calamita MA, Coachman C, Morimoto S. Influence of enamel preservation on failure rates of porcelain laminate veneers. Int J Periodontics Restorative Dent. 2013;33:31–39.
From Decisions in Dentistry. March 2022;8(3):16-19.
