 SEB_RA/ISTOCK/GETTY IMAGES PLUS
Novel Technique for Placing Sealants
This new technique aims to improve the effectiveness of sealants by obtaining the cleanest pits and fissures possible.
Sealants are one of the most effective strategies to prevent occlusal caries on posterior teeth. The etching-bonding of composite material to enamel is one of the strongest bonds achievable in dentistry. A recent Cochrane review indicates that sealants can reduce decay in posterior teeth by 11% to 51%.1 The longer the sealant is retained on the tooth and the deeper its penetration, the greater its efficacy in preventing decay.2 However, the bond of the sealant is predicated on securing a clean tooth (both on the enamel and in the fissures), in addition to ensuring the sealant flows well into the tooth’s pits and fissures. Multiple techniques for cleaning or preparing the fissures have been presented, including pumice, air abrasion, and the use of a round bur.3,4 This article presents a novel technique based on a previous research project and clinical experience to obtain the cleanest tooth fissures possible, thus allowing the sealant to penetrate and bond with the tooth’s pits and fissures.
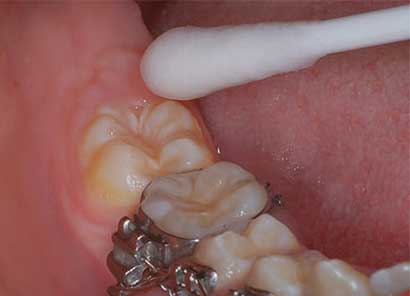
3.5% hydrogen peroxide on the tooth with a
cotton tip applicator.
Typically, placing sealants does not involve any tooth preparation. According to the Code on Dental Procedures and Nomenclature (CDT), a sealant is reimbursed with code D1350. If the tooth is prepared to open the fissures, such as with a ¼ round bur, the new CDT code is D1351 for a preventive resin restoration (sometimes called a caries biopsy).5–7 This sealant technique will focus on cleaning the grooves chemically without any mechanical debridement.
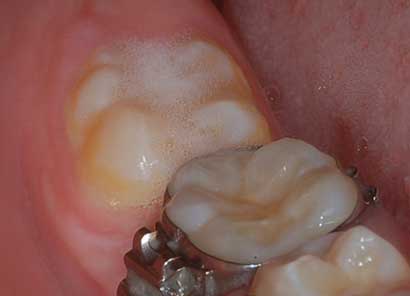
reaction from the contact of hydrogen peroxide as
plaque and bacteria are removed
In order to clean the grooves without preparing the tooth, typically a bristle brush with nonfluoridated flour of pumice is used;8 however, the pumice does not penetrate the fissures well.9,10 It has been shown that hydrogen peroxide will penetrate the grooves and kill bacteria.11–14 Evidence has also shown that hydrogen peroxide will remove biofilm and improve gingival scores in bleaching.15,16
Sealant technique success is dependent on obtaining proper isolation in order to avoid saliva contamination of the tooth. This isolation can be accomplished with a dental dam, cotton rolls and suction, a well-trained dental assistant, or with combination mouth-prop-and-suction devices.
bubbles.
TECHNIQUE
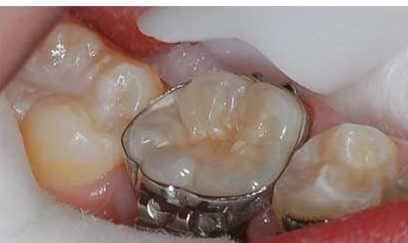
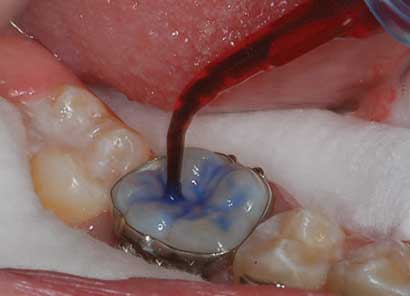
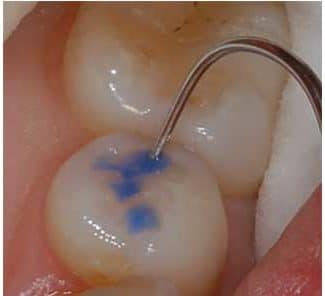
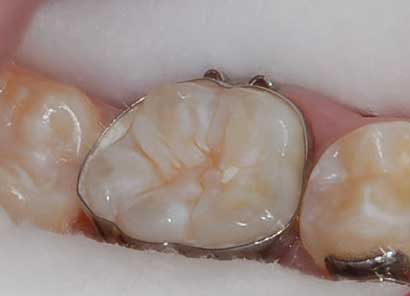
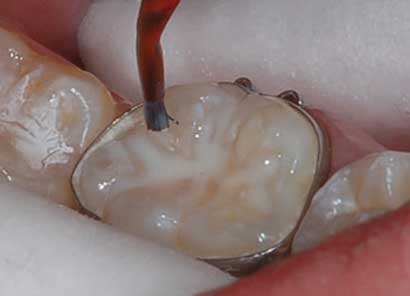
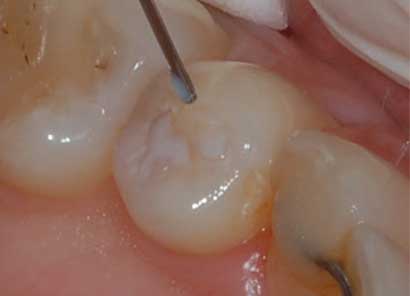
The first step in this new sealant technique is to use chemical means to clean the plaque and debris by applying 3.5% over-the-counter hydrogen peroxide with a cotton swab to remove plaque and kill the bacteria in the fissures (Figure 1). One drop of hydrogen peroxide will bubble and foam when placed in contact with the fissures (Figure 2). After the bubbling and foaming are completed — usually 5 to 10 seconds — the tooth can be rinsed vigorously (Figure 3).
bubbles in the fissures (which would prevent the etchant from contacting and etching all of the enamel).
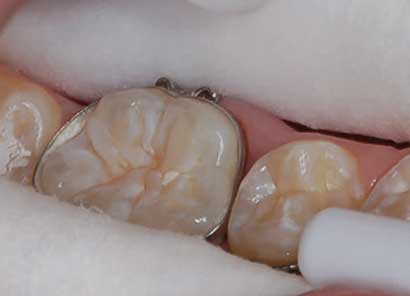
After isolating and cleaning the tooth, the enamel should be etched using conventional phosphoric acid (Figure 4). Because the fissures are narrow, the clinician should use an explorer to stir the etchant so there are no air bubbles over the enamel, which might prevent an adequate etch (Figure 5). For uncut enamel, the etching time is 30 seconds, followed by 30 seconds of rinsing. Next, the tooth is suctioned with high-volume suction and dried with an air syringe (Figure 6).
The challenge at this point is removing all moisture from the etched fissures so the composite resin material can bond well. A second, new recommendation is to remove moisture with a water chaser or prime-and-dry material (Figure 7). This watery material penetrates the grooves and displaces water much in the same manner as a dentin primer penetrates dentin and displaces water.17 The water chaser is air-dried to facilitate evaporation, resulting in clean, well-etched, dry enamel (Figure 8). A hydrophilic sealant can then be placed.

A minimum amount of sealant should be used during application (Figure 9), as capillary action of the dry enamel tends to draw the sealant into the fissure. The unset sealant still needs to be stirred with an explorer or application tip to pop or remove any air bubbles (Figure 10). Once the sealant is smooth and bubble free, it is light cured.
the water chaser and provide a clean, dry
surface for bonding.
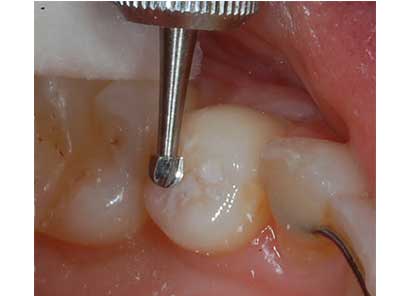
The final step is to evaluate the occlusion. Although some patients will “wear in” a high sealant over time, there is the potential for creating sensitivity or pain if the occlusion is not addressed. The potential for debonding in thin areas of the sealant is also possible. One final new recommendation for adjusting occlusion is to use a slow-speed, latch-type round bur, either a #4 or #6 (Figure 11). The slow-speed, latch-type round bur will not cut enamel, but will remove composite. This technique provides a way to adjust occlusion on the restoration without changing the natural tooth occlusion. Use of this bur can both remove excess material and smooth the restoration.
with a small brush tip to avoid trapping air.
DISCUSSION
One question with the use of hydrogen peroxide is whether the oxygen in the hydrogen peroxide will reduce the sealant’s bond strength to the etched enamel. After traditional tray bleaching with hydrogen peroxide, the clinician must wait at least two weeks for the oxygen in the tooth to dissipate or there will be a 25% to 50% reduction in bond strength between the composite and tooth.18 However, this two-week delay is not appropriate when placing sealants. During traditional bleaching, the incorporation of oxygen into the tooth occurs when the peroxide is on the tooth 30 minutes or longer, not 10 to 30 seconds, as in this suggested sealant technique.
In a previous research project, carbamide peroxide and hydrogen peroxide materials were tested for the effect of short-term applications on bond strengths when used to remove stains from bovine teeth.19 The study reported the results when 10% carbamide peroxide was applied for 10, 20 and 30 seconds. Compared to the control bond strength, there was no statistical difference in the bond strengths in any of the treated groups. Ten percent carbamide peroxide is equivalent to 3.5% hydrogen peroxide, and this 3.5% concentration correlates with the over-the-counter hydrogen peroxide used in this new technique. An additional product evaluated in the research but not reported in the paper was 40% hydrogen peroxide. Again, there was no difference in the bond strengths between the 40% hydrogen peroxide and the control samples when left on the enamel for up to 30 seconds. Hence, both 10% carbamide peroxide and 3.5% hydrogen peroxide can be used for short-term application to remove stains or clean teeth without detrimental effect on the bond strengths of composite resin material.
changing the natural occlusion.
CONCLUSION
The use of 3.5% hydrogen peroxide in a short-term application to clean the occlusal surface and fissures of a tooth and kill bacteria in the fissure — as well as the use of a water chaser to displace moisture — can aid in placing well-bonded sealants. Adjustment of the occlusion on the sealant can be safely achieved with a slow-speed, latch-type round bur, which will not damage the enamel or remove natural tooth contacts.
Despite its promise to improve efficacy and retention of sealants, additional research is needed to provide further support of this new clinical technique.
KEY TAKEAWAYS
- This article presents a novel technique designed to obtain the cleanest tooth fissures possible, thus allowing dental sealants to effectively penetrate and bond with the tooth’s pits and fissures.
- Sealant bond strength is predicated on securing a clean tooth; the clinician also needs to ensure the material flows well into the tooth’s pits and fissures.
- The technique presented here focuses on cleaning the grooves chemically without mechanical debridement.
- Clinicians can remove plaque and kill bacteria in the fissures by applying 3.5% hydrogen peroxide with a cotton swab.
- The use of a water chaser to displace moisture can aid in placing well-bonded sealants.
- Adjusting occlusion on the sealant can be safely achieved with a slow-speed, latch-type round bur, which will not damage the enamel or remove natural tooth contacts.
REFERENCES
- Ahovuo-Saloranta A, Forss H, Walsh T, Nordblad A, Mäkelä M, Worthington HV. Pit and fissure sealants for preventing dental decay in permanent teeth. Cochrane Database Syst Rev. 2017;7:CD001830.
- Prabakar J, John J, Arumugham IM, Kumar RP, Sakthi DS. Comparative evaluation of the viscosity and length of resin tags of conventional and hydrophilic pit and fissure sealants on permanent molars: an in vitro study. Contemp Clin Dent. 2018;9:388–394.
- Chan DCN, Summitt JB, Garcia-Godoy F, Hilton TJ, Chung KH. Evaluation of different methods for cleaning and preparing occlusal fissures. Operative Dent. 1999;24:331–336.
- Blackwood JA, Dilley DC, Roberts MW, SwiftJ J Jr. Evaluation of pumice, fissure enameloplasty and air abrasion on sealant microleakage. Pediatr Dent. 2002;24:199–203.
- Mitchell JK, Brackett MG, Haywood VB. Strategies to avoid under-diagnosing fissure caries. Compend Contin Educ Dent. 2018;39:79–84.
- Haywood VB, Jeter R. The Occlusal Caries Biopsy Helps Preserve Teeth. Available at: dentistrytoday.c/m/news/todays-dental-news/item/2518-the-occlusal-cariesbiopsy-helps-preserve-teeth. Accessed March 9, 2020.
- American Dental Association. Code on Dental Procedures and Nomenclature (CDT Code). Available at: ada.org/en/publications/cdt. Accessed March 9, 2020.
- Hatibovic-Kofman S, Wright GZ, Braverman I. Microleakage of sealants after conventional, bur, and air-abrasion preparation of pits and fissures. Pediatr Dent. 1998;20:173–176.
- Agrawal A, Shigli A. Comparison of six different methods of cleaning and preparing occlusal fissure surface before placement of pit and fissure sealant: an in vitro study. J Indian Soc Pedod Prev Dent. 2012;30:51–55.
- Hatibovic-Kofman S, Butler SA, Sadek H. Microleakage of three sealants following conventional, bur, and air-abrasion preparation of pits and fissures. Int J Paediatr Dent. 2001;11:409–416.
- Amaechi BT II, Barghi N, Jouett RM, Summit J. Bacteriocidal effects of carbamide peroxide bleaching gel (abstract 3245). Available at: https://iadr.abstractarchives.com/abstract/2005Balt-58536/bacteriocidal-effects-of-carbamide-peroxide-bleaching-gel. Accessed March 9, 2020.
- Napimoga MH, de Oliveira R, Reis AF, Gonçalves RB, Giannini M. In vitro antimicrobial activity of peroxide-based bleaching agents. Quintessence Int. 2007;38:e329–e333.
- Gurgan S, Bolay S, Alaçam R. Antibacterial activity of 10 percent carbamide peroxide bleaching agents. J Endod. 1996;22:356–357.
- Bentley CD, Leonard RH, Crawford JJ. Effect of whitening agents containing carbamide peroxide on cariogenic bacteria. J Esthet Dent. 2000;12:33–37.
- Curtis JW, Dickinson GL, Downey MC, et al. Assessing the effects of 10 percent carbamide peroxide on oral soft tissues. J Am Dent Assoc. 1996;127:1218–1223.
- Reinhardt JW, Eivins SE, Swift EJ Jr, Denehy GE. A clinical study of nightguard vital bleaching. Quintessence Int. 1993;24:379–384.
- Garg N, Indushekar KR, Saraf BG, Sheoran N, Sardana D. Comparative evaluation of penetration ability of three pit and fissure sealants and their relationship with fissure patterns. J Dent (Shiraz). 2018;19:92–99.
- Da Silva Machado J, Candido MS, Sundfeld RH, et al. The influence of time interval between bleaching and enamel bonding. J Esthet Restor Dent. 2007;19:111–1118.
- Cooper JR, Young NB, Haywood VB, Mettenburg D, Callan R, Rueggeberg FA. Effect of short-durations, localized carbamide peroxide application to remove enamel staining on bond strength of resin cement to enamel. J Esthet Restor Dent. 2016;28:190–196.
Van B. Haywood, DMD, has received research grants and other financial or material support from Ultradent Products. Kim L. Capehart, DDS, PhD, MBA, and Jeril R. Cooper III, DMD, have no commercial conflicts of interest to disclose.
From Decisions in Dentistry. April 2020;6(4):16–18,21.
