
 EDHAR/ISTOCK/GETTY IMAGES PLUS
Digital Workflow for Occlusal Guards
Digital technologies that allow the in-office design and fabrication of occlusal guards can reduce chairtime and fabrication time, thus improving the patient and provider experience.
Dentistry continues to adapt digital technologies for the delivery of patient care. Procedures previously limited to analog techniques — such as crowns, fixed partial dentures, removable dentures, dental implant therapy, smile design, and occlusal guard fabrication — now have complementary digital approaches. For the purposes of this article, “analog” will refer to “performing a task using physical means and materials, usually carried out by hand,” while “digital” relates to “converting physical or analog structures into a digital format to be manipulated using computer aided design/computer aided manufacturing (CAD/CAM) technologies.”1 As digital dentistry continues to evolve, more techniques lend themselves to digital workflows. As one example, this paper will explore the use of CAD/CAM — and, more specifically, three-dimensional (3D) printing — in the design and fabrication of occlusal guards.
Perhaps most commonly used for restorative procedures, CAD/CAM dentistry often begins with digital renditions of oral structures captured using an extraoral chairside scanner. The digital scans are processed with special software to design custom-fit restorations. Based on the digital design, final restorations can be milled in-office from a solid block material. Alternatively, the design can be sent to a laboratory for fabrication.
Reports in the literature suggest these digital approaches to restorative procedures can have similar outcomes to traditional analog techniques for a variety of tooth-supported, fixed prostheses;2,3 in addition, observational data for its application in implant-supported prostheses continue to accumulate.4,5 A CAD/CAM approach is also being explored for complete dentures,6 although continuing refinements to image capturing technology and technique may be needed to accurately depict long-span edentulous spaces.7 It is likely that digital workflows for various aspects of restorative dentistry will continue to evolve, as this approach seems to be well-received by patients.8
While much of the focus has been on restoration, this approach also has applications for preventive and maintenance procedures. For example, occlusal appliances (e.g., occlusal guards) are a noninvasive means of managing bruxism.9 Delivery of occlusal guards has traditionally involved physical impressions of dental arches, followed by the pouring of stone models and wax-based fabrication. A digital approach to fabrication offers an intriguing alternative.10
It should be noted that, generally speaking, digital approaches in dentistry do not completely eliminate the need to consider established biomechanical principles. Rather, sound principles are observed with the aid of digital workflows. The following is a description of a 3D printing process for occlusal guards that is currently being utilized in a graduate prosthodontic clinic setting. Available in desktop models suited for in-office use, 3D printers build the physical model (in this case, a guard) from digital information by laying down the desired material in thin, layer-by-layer increments. The modality described in this report uses stereolithography (an additive manufacturing method that creates an object by using a laser beam to cure a photoreactive resin).
DIGITAL WORKFLOW
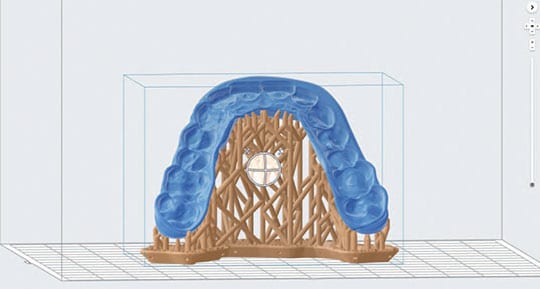
1. The process of using a 3D printer to print an occlusal guard begins by digitally scanning the maxillary and mandibular arches. A leaf gauge is placed between the anterior teeth to ensure the appliance is fabricated with the optimal distance of 1.5 to 2 mm at the closest point, and with the condyles in centric relation (Figure 1). This digital step addresses what in an analog approach would have consisted of maxillary and mandibular impressions, followed by interocclusal record registration.


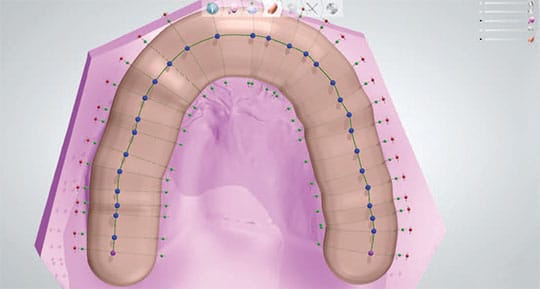
2. Because a real-time, 3D rendering of both arches has been captured digitally, there is no need to fabricate working models. Any occlusal guard must be fabricated in a manner that facilitates insertion and removal, so any undercut areas must be blocked. Using special CAD software, the path of insertion is determined and the height of contour is outlined, after which the software blocks out any areas of undercuts (Figure 2). In an analog approach to occlusal guard fabrication, a laboratory technician would need to pour an arch model and physically apply block-out material to the model.
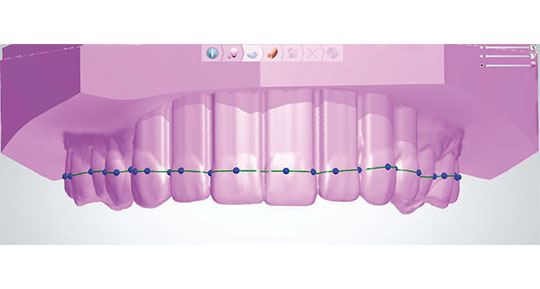

3. Once the undercuts are blocked, the outline of the occlusal guard can be traced (Figure 3). The software generates a shell (Figure 4) to which a bar is added that serves as the editable precursor to the final guard design (Figure 5). The colored dots allow movement of the bar up and down, as well as widening or narrowing for proper coverage of the teeth (Figure 6).
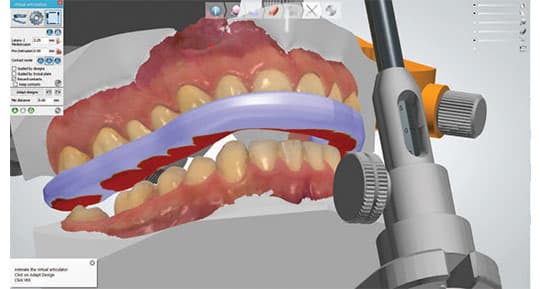
4. At this point, the occlusal guard is virtually created and the clinician uses a virtual articulator to reproduce the pathways of the mandibular movements. In essence, the provider is designing the cameo surface of the appliance, and tracing and accounting for the occlusal movements (Figure 7). If using an analog approach, each of these steps would have been done with wax, stone models and a physical articulator. In a digital workflow, the final design step is to smooth the appliance, and add patient identifiers (such as built-in name tags), if desired.

5. Once the design of the occlusal guard is completed, the software can generate a standard tessellation language file (STL) file, which is exported to software built into the 3D printer. The software utilizes the STL file to orient the appliance on the printer’s platform, designs the supports (similar to sprues for casting in analog methods), and selects the material to be used (Figure 8). Once setup is complete, the software sends the instructions to the printer via a wireless or cable connection. This digitally fabricated preparatory step replaces the traditional investment of a wax pattern in stone and subsequent boil-out.
6. Materials used for 3D printing are continually improving, and a long-term biocompatible material was chosen for the clinic’s occlusal guard fabrication technique. After a cartridge of the desired material has been placed, the provider can initiate the 3D printing process. Fabrication times will vary, depending on design characteristics — such as thickness, position on the platform, and the chosen material. The authors have observed times ranging from two to three hours for occlusal guards, related primarily to the size of the guard.

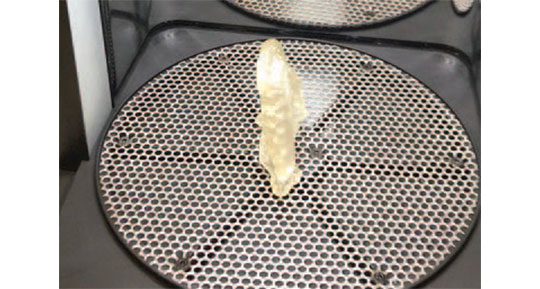
7. When the printer concludes the printing job, the post-processing protocol is completed per the manufacturer’s instructions. The printed appliance is placed in the form wash unit with isopropyl alcohol for 5 minutes to remove any uncured resin, followed by air-drying for a minimum of 30 minutes (Figure 9). For an effective post-cure, the occlusal guard is placed in a curing unit — which, in the process described here, exposes the guard to heat (60 degrees Celsius) and light (405 nanometer wavelength) for 30 minutes (Figure 10).
8. After completion of the post-curing process, the supports are removed with a separating disk, and the occlusal guard is smoothed with acrylic burs and polished with pumice in the same manner as a traditional acrylic occlusal guard (Figure 11). The protocol for patient delivery — insertion and evaluation — of a 3D-printed guard is the same as if using conventional fabrication techniques. Anecdotally, it has been the authors’ experience that chairtime may be reduced due to the accuracy of the fit and minimal need for adjustments.

CONCLUSION
This complete digital workflow for fabricating occlusal guards has the potential to improve not only the patient experience, but also the operator’s. Compared to laboratory fabrication, it allows a faster turnaround time. It also minimizes chairtime, as well as the materials needed — and the saved data facilitates remakes if a guard is lost.
Besides the learning curve, the primary drawback of an in-house digital workflow is the initial capital investment in equipment (chiefly consisting of an intraoral scanner, 3D printer and post-curing unit. While it may be difficult to justify acquisition of this suite of machines just for fabrication of occlusal guards, if a practice is already using a compatible intraoral scanner for other restorative applications, investment in a 3D printer may be the logical next step.
Alternatively, if a compatible intraoral scanner is already a part of the clinical armamentarium, fabrication of the occlusal guard can be outsourced to a laboratory by electronically sending the file captured by the scanner. However, in this scenario the practice loses the advantages of design control and quick turnaround.
As should be evident from this all-digital approach to 3D printing, occlusal guards can be reliably fabricated utilizing CAD/CAM techniques. The in-office use of this technology represents the state of the art in digital dentistry — and provides an exciting glimpse of potential future applications.
KEY TAKEAWAYS
- The paper presents an overview of a three-dimensional (3D) printing process for occlusal guards that is currently being utilized in a graduate prosthodontic clinic. This approach also has application in private practice.
- The process of using a 3D printer to print occlusal guards begins by scanning the maxillary and mandibular arches. Because a 3D rendering of both arches has been captured digitally, there is no need to fabricate working models.
- Once the occlusal guard is created virtually, the clinician uses a virtual articulator to reproduce the pathways of the mandibular movements.
- Following guard fabrication with 3D printing, the protocol for patient delivery — insertion and evaluation — is the same as if using conventional manufacturing methods.
- Compared to laboratory services, in-office design and manufacturing reduces fabrication times.
- Anecdotally, it has been the authors’ experience that chairtime may also be reduced due to the accuracy of the fit and minimal need for adjustments.
REFERENCES
- Grant GT, Campbell SD, Masri RM, Anderson MR, American College of Prosthodontists Digital Dentistry Glossary Development Task Force. Glossary of digital dental termsJ J Prosthodont. 2016;25(Suppl 2):S2–S9.
- Lo Russo L, Caradonna G, Biancardino M, De Lillo A, Troiano G, Guida L. Digital versus conventional workflow for the fabrication of multiunit fixed prostheses: A systematic review and meta-analysis of vertical marginal fit in controlled in vitro studies. J Prosthet Dent. April 23, 2019. [Epub ahead of print]
- Goujat A, Abouelleil H, Colon P, et al. Marginal and internal fit of CAD-CAM inlay/onlay restorations: a systematic review of in vitro studies. J Prosthet Dent. 2019;121:590–597.
- Flügge T, van der Meer WJ, Gonzalez BG, Vach K, Wismeijer D, Wang P. The accuracy of different dental impression techniques for implant-supported dental prostheses: a systematic review and meta-analysis. Clin Oral Implants Res. 2018;29(Suppl 16):374–392.
- Mühlemann S, Kraus RD, Hämmerle CH, Thoma DS. Is the use of digital technologies for the fabrication of implant-supported reconstructions more efficient and/or more effective than conventional techniques: a systematic review. Clin Oral Implants Res. 2018;29(Suppl 18):184–195.
- Kattadiyil MT, Al Helal A, Goodacre BJ. Clinical complications and quality assessments with computer-engineered complete dentures: a systematic review. J Prosthet Dent. 2017;117:721–728.
- Bohner L, Gamba DD, Hanisch M, et al. Accuracy of digital technologies for the scanning of facial, skeletal, and intraoral tissues: a systematic review. J Prosthet Dent. 2019;121:246–251.
- Gallardo YR, Bohner L, Tortamano P, Pigozzo MN, Lagana DC, Sesma N. Patient outcomes and procedure working time for digital versus conventional impressions: a systematic review. J Prosthet Dent. 2018;119:214–219.
- Jokubauskas L, Baltrušaitytė A, Pileičikienė G. Oral appliances for managing sleep bruxism in adults: a systematic review from 2007–2017. J Oral Rehabil. 2018;45:81–95.
- Salmi M, Paloheimo KS, Tuomi J, Ingman T, Mäkitie A. A digital process for additive manufacturing of occlusal splints: a clinical pilot study. J R Soc Interface. 2013;10:20130203.
The authors have no commercial conflicts of interest to disclose.
From Decisions in Dentistry. November/December 2019;5(10):24,26—28.
