
 CREDITVIDI STUDIOISTOCK/GETTY IMAGES PLUS
Implantology Techniques to Avoid Complications
Careful planning and placement will help minimize complications and peri-implant disease following dental implant procedures.
Most complications from dental implant procedures can be avoided with proper treatment planning prior to surgery. A comprehensive systemic evaluation, oral evaluation, and diagnostic work-up of the implant site(s) should be performed before the surgical phase. Having a clear understanding of the desired implant outcome — from a surgical and restorative standpoint — will aid the surgeon during implant placement. It is important to understand and assess the complexity of the case to manage both surgical and patient expectations. When the presurgical work-up is incomplete or skipped altogether, the risk and rate of complications is high. However, even the most well-prepared and executed cases can have surgical complications, unesthetic results, and eventually result in peri-implant disease.
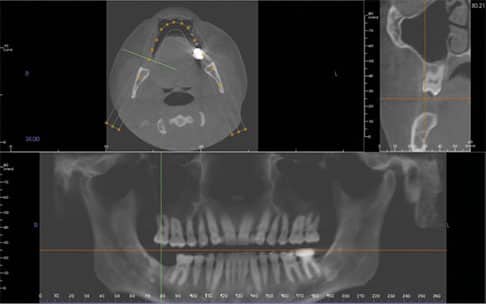
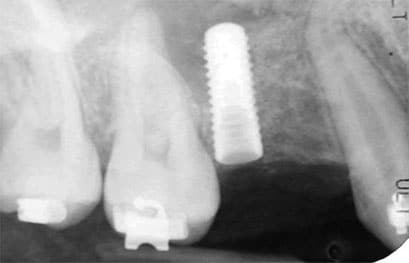
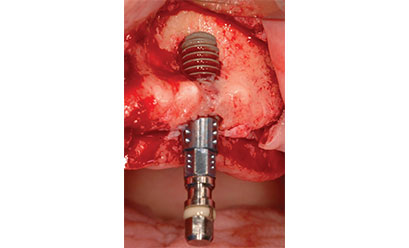
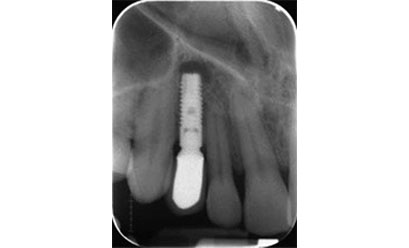
Before proceeding with implant surgery, it is critical to obtain a set of quality diagnostic radiographs. Typically, periapical radiographs and/or a cone beam computed tomography (CBCT) scan is recommended for implant placement (Figure 1). While panoramic images tend to distort the teeth and jaws, particularly at the midline of the image, they can provide a general overview of key anatomic structures (such as nerves and the maxillary sinus). Taking intraoperative radiographs during the dental implant procedure and osteotomy preparation is highly recommended. It is advisable to drill to a depth of 4 to 6 mm with the first drill in the osteotomy sequence, and take a periapical radiograph to check the depth and angulation of the implant (Figure 2). This will allow correction early in the osteotomy preparation if needed.
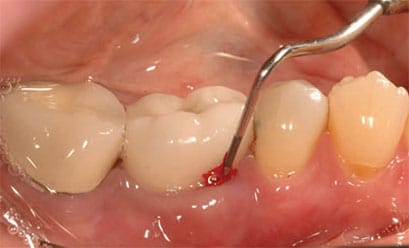
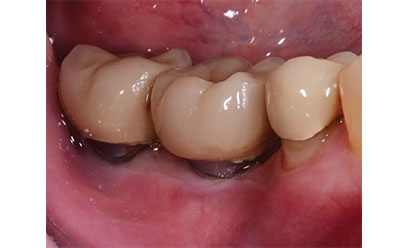
Final implants that are not well positioned can result in unesthetic results and an inability to properly clean and maintain the implant (Figure 3). Dental implants that are not positioned in the center of the restorative space, or are angled, can create undercuts and may result in areas of the restoration that are over- or under-contoured. When the ideal emergence and contour is not achieved, it creates areas that are difficult for the patient to maintain. Over time, this can lead to peri-implant disease and bone loss (Figure 4).
Not only can the angle of the implant affect the restorative dentist’s ability to fabricate a restoration that is both esthetic and cleansable, the depth of the implant platform is also critical to implant success and maintenance. It is recommended the platform be positioned 3 mm below the proposed gingival margin (approximately 3 mm below the cementoenamel junction of the adjacent teeth in a patient with no bone loss) to allow for papilla formation and an ideal emergence profile. Implants that are too shallow (platforms positioned less than 3 mm from the gingival margin) will result in no papilla formation, and may lead to implants that are visible through the soft tissue. This results in an implant crown that lacks an ideal emergence profile, creating a “flat crown” at the base of restoration. Implants that are too deep (platforms positioned greater than 4 mm apical to the gingival margin) can result in deep probing depths and implants that are difficult to adequately clean. Over time, this can result in pocketing around the implant and peri-implant disease.

a depth of approximately 4 mm with the first drill in
the osteotomy preparation sequence. A periapical
radiograph is taken to check the depth and
angulation of the guide pin in the osteotomy site. FIGURE 2 COURTESY THOMAS G. WILSON Jr., DDS
BONE LEVEL ANALYSIS
Ideally, there should be at least 2 to 3 mm of bone between the implant and adjacent anatomic structures (such as the mental foramen, inferior alveolar nerve, maxillary sinus and lingual undercuts) to avoid possible implant complications that could result in bleeding and/or nerve trauma.1 It is also recommended there should be least 1.5 mm of bone between the implant and adjacent teeth, and 3 mm between contiguous implants to allow for papilla formation.2 Unesthetic results are possible when these guidelines are not followed. Implants that are too close to natural teeth or other implants result in the absence of the interproximal papilla, phonetic difficulty and food impaction.3
When placing an implant with a roughened surface (sandblasted and acid-etched) it is crucial for the surgeon to place the entire roughened implant surface into bone. If part of the implant surface is exposed to the oral environment, or is in direct contact with soft tissue, corrosion of the implant surface may occur.4 This could be a possible etiologic factor in the initiation of peri-implant disease. Implants that are placed too shallow and not completely surrounded by bone will create future esthetic and maintenance challenges for the patient and provider.
too far to the distal, creating a large undercut on
the mesial aspect of the crown. This creates a difficult area for patients to maintain, and
ultimately resulted in peri-implant bone loss.
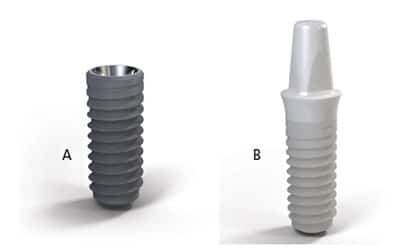
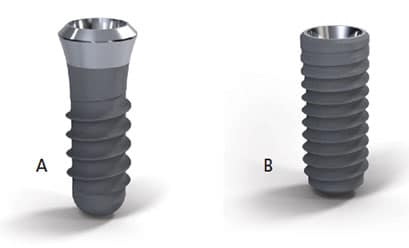
Prior to preparing the osteotomy, it is important to identify the ideal implant to use — for example, parallel-walled versus tapered, titanium versus ceramic (Figures 5A and 5B), and tissue level versus bone level (Figures 6A and 6B). Occasionally, changes will be made regarding the type and dimensions of the implant during the osteotomy preparation due to implant site anatomy. It is not uncommon to reduce the diameter or length of the implant during the procedure from what was originally planned (even if the case was planned digitally using a CBCT). This is why the surgeon should have a variety of implants in various diameters and lengths available in the event intraoperative changes are required.
Major complications can arise when there is a lack of adequate bone and/or keratinized tissue at the implant site. The more conservative approach would be to develop the implant site (with hard and soft tissue augmentation, if needed) prior to implant placement. When there is adequate bone (at least 1 to 2 mm on all aspects of the implant)5 and adequate soft tissue (at least 2 mm of keratinized tissue on all aspects of the implant),6 the dental implant procedure is typically less complicated and the patient will experience fewer postoperative peri-implant issues.
On occasions where the implant site is lacking adequate bone and soft tissue, the surgeon must decide whether to perform these procedures first (which would require two surgeries) or if the provider feels confident in a successful graft at the time of implant placement. The greatest risk with grafting at the time of implant placement is if the graft does not integrate, the patient will have an implant that is not completely surrounded by bone. This can lead to exposure of the implant threads and possible contamination of the implant surface. Additionally, darkness in the soft tissue due to show-through of the titanium implant surface is likely to compromise esthetics. The lack of a facial plate of bone also results in less bone-to-implant contact, which could increase the possibility of implant failure due to lack of osseointegration (Figure 7).
Often, there will be a small dehiscence on the facial aspect of the implant during placement. A small dehiscence can typically be grafted at the time of implant placement. Many clinicians will use human and/or bovine bone. Sometimes, layers of human bone and bovine bone are used together in an effort to restore the ridge. If the surgeon encounters a large dehiscence, however, it may be best to only perform a hard tissue graft, and place the implant at a later date (typically, three to six months).
IMPORTANCE OF KERATINIZED TISSUE
The importance of adequate keratinized tissue at the implant site cannot be overstated. Because soft tissue attachment to an implant differs from a natural tooth (long junctional epithelium versus connective tissue attachment), bacterial invasion of an implant occurs more rapidly. It also creates more bony destruction around an implant than a natural tooth. Mucosa does not adequately protect an implant in the long term. In dental implantology, every effort should be made at the time of placement to ensure adequate keratinized tissue (at least 2 mm on all aspects of the implant). If not, future peri-implant disease is likely (Figure 8).
The stability of the implant at the time of placement can also impact the patient’s prognosis. Implants that do not achieve primary stability tend to have higher failure rates than implants that are stable when placed.7 The stability of the implant is also critical when considering immediate loading. Many clinicians use 35 N-cm as the minimum threshold to provisionally restore or load an implant. When torque is less than 35 N-cm and the implants are not splinted via cross-arch stabilization, the chances of successful outcomes may be diminished. Oftentimes, implants that are overloaded during the healing phase will be completely lost and the patient and surgeon will have to start over.
ADDITIONAL SURGICAL CONSIDERATIONS
Other surgical considerations that can result in complications, implant loss or peri-implant disease include infection at the implant site, implant osteotomy preparation, irrigation of the bone during osteotomy preparation, and over-torqueing of the implant at the time of insertion. It is crucial the site in which the implant is being placed is thoroughly cleaned, debrided and infection-free prior to placing the implant. When placement is done in two phases (removal of the tooth with a bone graft, followed by implant placement three to six months later), the chances of a residual infection at the site of implant placement are small. In comparison, when an implant is placed immediately into an extraction socket (especially if the site contained a tooth that had a periapical lesion), the chances of bacterial contamination in the socket are high. Systemic antibiotics are routinely used prior to, during and after surgery.8 The site should be thoroughly irrigated with saline or sterile water. Some clinicians use chlorhexidine gluconate 0.12% or iodine to disinfect the socket. Bone that has not been adequately decontaminated locally and/or systemically with the use of antibiotics is subject to postoperative implant infections (Figure 9).
presence of minimal to no keratinized tissue.
Implant drill speed and adequate irrigation are also critical during the osteotomy preparation to avoid overheating and bone trauma. Bone can undergo necrosis at 47° Celsius.9 If the clinician fails to use sharp drills, does not follow the manufacturer’s recommended protocols, or does not use adequate irrigation, the osteotomy preparation can result in necrosis of the bone and loss of the implant. It is important to check the manufacturer’s recommendations regarding drill speed. Generally, the larger the diameter of the drill, the slower the speed.
The amount of torque applied to the implant at the time of placement is also critical. Over-torqueing the implant can result in pressure necrosis of the bone. Most implant manufacturers recommend an insertion torque of approximately 35 N-cm. Many of the implant fixture mounts (the device used to seat the implant) are designed to fail or break between 50 to 75 N-cm to help prevent over-torqueing. The implant’s thread design can also contribute to pressure necrosis. Aggressive thread designs or osteotomy preparations that underprepare the osteotomy relative to the diameter of the implant increase the amount of friction that is applied to the bone during implant placement.
FINAL THOUGHTS
Knowing the many complications that can arise during dental implant procedures, the surgeon should be prepared to handle possible challenges. Ultimately, the best approach is to avoid complications in the first place by having a comprehensive treatment plan, and an adequate preprocedural work-up and site evaluation. Using a surgical guide to aid in implant placement is also recommended. Placing the implant in adequate bone, ensuring adequate keratinized tissue, and being mindful of the adjacent anatomy and anatomical landmarks can also reduce complication rates.
Finally, good surgical technique regarding osteotomy preparation and implant insertion should help the clinician avoid early implant failures. Peri-implant disease affects a significant number of dental implants (some studies suggest more than 50%).10 Placing an ideally positioned implant in good quality bone and soft tissue — and restoring it with a crown and abutment that have ideal contours and emergence profile — is the best way to reduce intraoperative complications and future peri-implant problems.
KEY TAKEAWAYS
- Prior to the dental implant procedure, a comprehensive systemic evaluation, oral evaluation, and diagnostic work-up of the implant site(s) should be performed.
- Having a clear understanding of the desired implant outcome — from a surgical and restorative standpoint — will aid the surgeon during implant placement.
- Dental implants that are not well positioned can result in unesthetic results and an inability to properly clean and maintain the implant.
- Not only can the angle of the implant affect the restorative dentist’s ability to fabricate a restoration that is both esthetic and cleansable, the depth of the implant platform is also critical to implant success.
- When the ideal emergence and contour is not achieved, it creates areas that are difficult for the patient to maintain. Over time, this can lead to peri-implant disease and bone loss.
- Every effort should be made during dental implant procedures to ensure adequate keratinized tissue (at least 2 mm on all aspects of the implant).
- Positioning the implant in adequate bone, and being mindful of the adjacent anatomy and anatomical landmarks during surgical placement can also reduce complication rates.
REFERENCES
- Misch CE. Root form surgery in the edentulous mandible: Stage I implant insertion. In: Contemporary Implant Dentistry. 2nd ed. St. Louis: CV Mosby; 1999:360.
- Tarnow DP, Cho SC, Wallace SS. The effect of inter-implant distance on the height of inter-implant bone crestJ J Periodontol. 2000;71:546–549.
- Gastaldo JF, Cury PR, Sendyk WR. Effect of the vertical and horizontal distances between adjacent implants and between a tooth and an implant on the incidence of interproximal papilla. J Periodontol. 2004;75:1242–1246.
- Rodrigues D. Titanium corrosion mechanisms in the oral environment: a retrieval study. Mater (Basel). 2013;6:5258–5274.
- Buser D, Martin W, Belser UC. Optimizing esthetics for implant restorations in the anterior maxilla: Anatomic and surgical considerations. Int J Oral Maxillofac Implants. 2004;19(Suppl):43–61.
- Bouri A Jr, Bissada N, Al-Zahrani MS, Faddoul F, Nouneh I. Width of keratinized gingiva and the health status of the supporting tissues around dental implants. Int J Oral Maxillofac Implants. 2008;23:323–326.
- Cobo-Vázquez C, Reininger D, Molinero-Mourelle P, González-Serrano J, Guisado-Moya B, López-Quiles J. Effect of the lack of primary stability in the survival of dental implants. J Clin Exp Dent. 2018;10:e14–e19.
- Surapaneni H, Yalamanchili PS, Basha MH, Potluri S, Elisetti N, Kiran Kumar MV. Antibiotics in dental implants: a review of literature. J Pharm Bioallied Sci. 2016;8(Suppl 1):S28–S31.
- Eriksson R, Albrektsson T. Temperature threshold levels for heat induced bone tissue injury: a vital-microscopic study in the rabbit. J Prosthet Dent. 1983;50:101–107.
- Lee CT, Huang YW, Zhu L, Weltman R. Prevalences of peri-implantitis and peri-implant mucositis: systematic review and meta-analysis. J Dent. 2017;62:1–12.
The author has no commercial conflicts of interest to disclose.
From Decisions in Dentistry. February 2020;6(2):17–18,21–22.
