

10 Steps to Rubber Dam Isolation in Restorative Therapy
Not limited to endodontics, dental dams also offer clinical advantages in restorative dental treatment.
Adhesive dentistry has become an integral part of everyday restorative dentistry, as adhesives are involved in bonding composite resin and placing all-ceramic restorations, fiber posts, core build-up materials, and even gold restorations. Numerous studies have shown that for successful long-term bonding, a surface free of contaminates — such as crevicular fluid, saliva glycoproteins and blood — is necessary.1 It is well known the only way to achieve and maintain a clean restorative surface is with rubber dam isolation, hence the need for clinicians to be efficient in placing dams for restorative therapy.
A survey of the use of dental dams revealed that 63% of U.S. dentists do not use this type of isolation for any type of restorative procedure.2 A reason commonly expressed for lack of use is that dam placement is time consuming. The authors of this article believe the lack of practice and improper technique explain why placing dams can be time consuming. The aim of this article is to describe a simple and effective 10-step technique for achieving dam isolation.

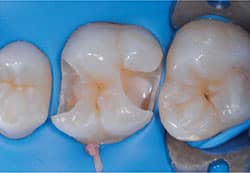
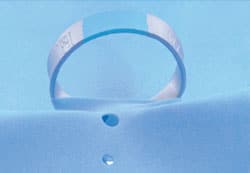
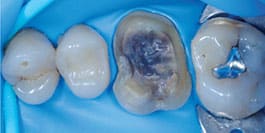
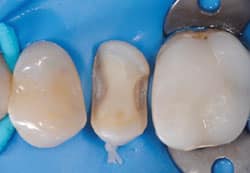
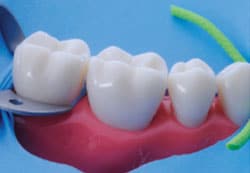
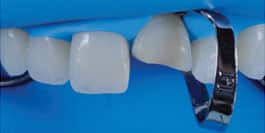
1 Material selection: Dental dams can be classified into three groups based on thickness: thin, medium or thick. The thicker the dam, the more tissue retraction that can be achieved. For everyday restorative therapy, the medium thickness is ideal, as it offers both good tear resistance and tissue retraction. If additional retraction is needed, the dam can be supplemented with retraction cord and a floss ligature (Figure 1 and Figure 2).
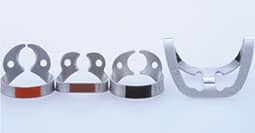
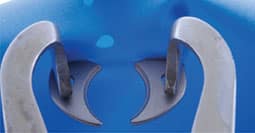
2 Clamp styles: Clamps can be classified into two groups: retentive and retraction clamps. There are approximately 37 different retentive clamps and six retraction clamps available. The authors have narrowed their personal selection to six clamps with which they are able to isolate at least 99% of restorative clinical cases. Designated as our “universal kit,” it consists of the W3, W2, W8A, 212, modified 212, and the Brinker clamp 4 (or B4, the only retraction clamp in the kit) (Figure 3 and Figure 4).

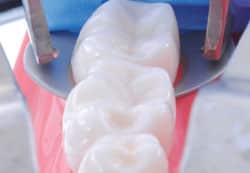
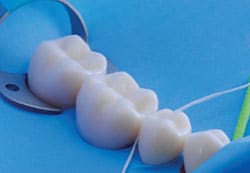
3 Dental dam perforation: It can be confusing to decide which of the five dam perforation options is best for a particular tooth or teeth. Taking into account that it is preferable in restorative therapy to isolate three or four teeth at a time (distant retention), the authors recommend using a combination of three perforation sizes. If a molar is chosen to hold the retentive clamp, the largest perforation size should be used. For any additional molar included in the isolation that will not be clamped, the second-to-largest perforation should be used. For every other tooth, the second-to-smallest perforation size should be used (Figure 5). Another important factor is the distance between the perforations; for every clinical situation, 5 to 6 mm between perforations will help achieve ideal isolation (Figure 6). The only modification recommended is when patients have edentulous spaces, in which case a 10-mm distance is suggested to compensate for the space (Figure 7).
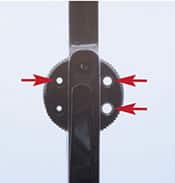
clamp (lower right), for molars (upper right), and for every other tooth in the mouth (left).

5 mm apart.
4 Attach the dam to the clamp: All the clamps in the universal kit are wingless designs, so normally the clamp will be secured on the retentive tooth first, and the dam will be stretched over it. This technique can pose some challenges, however, namely:
- The rubber dam can tear if overstretched
- If the clamp is not secure around the tooth, it could be displaced — with the possibility of being swallowed
![Perforation placement]()
FIGURE 7. Perforation placed at 10 mm to
compensate for the missing tooth.
The authors’ recommendation is to attach the dam to the clamp outside the patient’s mouth (Figure 8 and Figure 9) to avoid any problems. This is followed by holding and separating the jaws of the clamp using clamp forceps (Figure 10) in preparation to secure the dam and clamp to the abutment tooth.

5 Abutment tooth: At this point, the clamp forceps are held with one hand and the dam with the other. The jaws of the clamp are opened and passed over the tooth, only to let go once the jaws are at the level of the cervical third (Figure 11). This is followed by lightly stretching the dam over the clamp jaws (Figure 12). With the help of dental floss, the dam is lightly stretched over every tooth to be isolated. Next, the dam is secured at the mesial of the abutment tooth with latex rubber dam stabilizing cord (Figure 13).

the dam between each tooth.
6 Inverting the dam: One of the most important reasons for using a dental dam is to isolate the tooth to be restored. For this to happen, the dam must be inverted into the gingival sulcus. This can be achieved in two ways, depending on the depth of the preparation. When there is sufficient supragingival tooth structure, the dam can be inverted easily by blowing air with an air/water syringe around the cervical portion of the tooth to be restored, while pushing the dam into the sulcus using a cord-packing instrument (Figure 14). If the margins are subgingival, a floss ligature is necessary to push the rubber dam apically to obtain inversion (Figure 15).
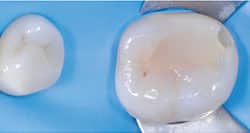
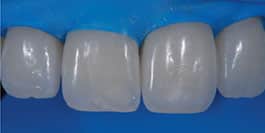
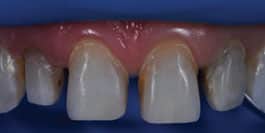
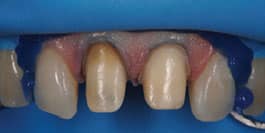
7 With anterior cases, is it always necessary to fully invert the dam? In anterior restorative therapy, inverting the dam may be difficult with patients who have a thick periodontal biotype. Depending on the location of the lesion to be treated, this may or may not be important. For example, when treating a white spot lesion on the incisal third of tooth #9 (Figure 16), inversion of the rubber dam is not necessary. But when accessing the gingival margin of a Class III or large Class IV lesion (Figure 17), dam inversion is crucial.
8 Dental dam removal: The easiest and most convenient way to remove the dam is by:
- Stretching the dam buccally until the interseptal dam between each perforation is visible (Figure 18)
- Cutting the interseptal dam using round-end scissors (Figure 19 and Figure 20)
- Removing the retentive clamps to release the dam

dam to expose the interseptal
portion.

9 The Brinker clamp 4: In the authors’ experience, the B4 is one of the most helpful clamps. As previously noted, this is a retraction clamp, which means it will push tissue away from the area to be restored. This is especially beneficial with cervical caries or abfraction lesions — cases that would be difficult to access or isolate without the use of a retraction clamp. Figure 21 shows a B4 clamp being used to retract the dam and gain access to the gingival margin of a porcelain veneer preparation during bonding.
10 The split rubber dam: When multiple anterior restorations are being delivered, a split dam technique may prove useful (Figure 22). In this technique, perforations are made following the recommendations outlined in this article: at least two teeth distal to the working area. Next, the interseptal dam is cut, splitting the dam into facial and lingual portions. Two W2 clamps are placed on the right and left maxillary first premolars to retain the dam. The dam’s facial aspect is folded underneath the upper lip, while the lingual portion is secured to the palate using cyanoacrylate (i.e., tissue glue) or block-out resin (Figure 23).
retract the tissue and rubber dam
prior to bonding a porcelain veneer.
CONCLUSIONS
Rubber dam isolation was first introduced to dentistry in 18643 and its benefits — including patient protection, improved clinical visibility, and ensuring contaminate-free surfaces — have been elucidated in numerous studies. Following a simple dam placement protocol (such as the one outlined in this article) for every procedure will help support successful long-term outcomes in restorative care. Through repetitive use, clinicians should be able to achieve complete isolation in less than three minutes, eliminating the most common reason for not using a dental dam. At the same time, this guide could be used to train dental assistants to efficiently and effectively isolate the operative area so it is ready for the dentist to initiate treatment.
KEY TAKEAWAYS
- Studies have shown that for successful long-term bonding in restorative dental treatment, a surface free of contaminates — such as crevicular fluid, saliva glycoproteins and blood — is necessary.1
- The only way to achieve and maintain a clean restorative surface is with dental dam isolation. This article describes a simple and effective technique for placing dams.
- For everyday restorative therapy, a medium-thickness dam is ideal, as it offers both good tear resistance and tissue retraction.
- When multiple anterior restorations are being delivered, a split dam technique may prove useful.
- With repetitive use, clinicians should be able to achieve complete isolation in less than three minutes.
REFERENCES
- Abduo J, Sambrook RJ. Longevity of ceramic onlays: A systematic review. J Esthet Restor Dent. 2018;30:193–215.
- Gilbert GH, Litaker MS, Pihlstrom DJ, Amundson CW, Gordan VV, DPBRN Collaborative Group. Rubber dam use during routine operative dentistry procedures: findings from the Dental PBRN. Oper Dent. 2010;35:491–499.
- Castellucci A. Tooth Isolation: the Rubber Dam. In: Textbook of Endodontics, Vol. 1. Florence, Italy: Firenze Il Tridente; 2004:226–243.
The authors have no commercial conflicts of interest to disclose.
From Decisions in Dentistry. November/December 2019;5(10):12—14.
