
 SIMPSON33/ISTOCK/GETTY IMAGES PLUS
Optimal Panorex Imaging
This review of radiography technique will help ensure diagnostic-quality panorex images.
PURCHASE COURSE
This course was published in the October 2020 issue and expires October 2023. The author has no commercial conflicts of interest to disclose. This 2 credit hour self-study activity is electronically mediated.
This course was published in the October 2020 issue and expires October 2023. The author has no commercial conflicts of interest to disclose. This 2 credit hour self-study activity is electronically mediated.
EDUCATIONAL OBJECTIVES
After reading this course, the participant should be able to:
- Explain the purpose of panoramic radiography in dental practice.
- Describe the formation of the panoramic image and correct imaging technique.
- Discuss errors commonly made when capturing panorex images, as well as clinical solutions to these challenges.
Dental radiographs are essential to providing comprehensive patient care. Radiographs allow clinicians to see conditions invisible to the naked eye and, when combined with oral assessments, provide valuable information about the patient’s health. Dental imaging includes intraoral techniques, such as bitewing and periapical X-rays, along with extraoral techniques, such as cephalometric and panoramic images. Intraoral radiography enables clinicians to clearly see the dentition and supporting structures, as well as diagnose alveolar bone loss and caries. Extraoral radiography, including panorex imaging, provides a larger field of view and assists in diagnosing conditions of the maxillofacial region.1–4
Panoramic radiography, an extraoral technique of the orofacial region, allows for examination of the dentition, maxilla, mandible, sinuses and temporomandibular joint in one image. These images are used to assess growth and development, trauma, lesions and impacted teeth, and should not be used to diagnose periodontal disease or caries.5–7 The radiographic guidelines issued by the American Dental Association and U.S. Food and Drug Administration help define the appropriate use of panorex imaging. The guidelines state radiographs should be prescribed after an in-depth assessment of the patient, and only if the images will provide additional information to facilitate comprehensive and effective care.8
Once a need for radiographs is determined, the guidelines suggest a panoramic radiograph, along with posterior bitewings, are a reasonable option for children with transitional dentition, and adolescents and adults who are new to a dental office and are being assessed for oral diseases. The guidelines also state a panorex may be beneficial to evaluate dental development, such as the eruption of third molars in adolescents.8
 The panoramic radiography technique produces a two-dimensional image of a three-dimensional structure. A panoramic radiograph divides the patient’s orofacial anatomy into two equal sections to either side of the midsagittal plane, which runs down the middle of the patient’s face. The resulting radiograph displays the nasal cavity and central incisors in the center of the image, while the patient’s right and left sides and cervical spine appear along the lateral borders.9,10 Clinicians should be knowledgeable about tomography, focal trough, rotation center, real images, and ghost images in order to fully utilize this technique.
Panorex imaging uses the radiographic technique called tomography. During a panoramic procedure, the radiation source and image receptor rotate around the patient’s head in opposite directions while the patient remains stationary. This rotation produces a radiograph by imaging one area of the orofacial region while blurring other areas. The acuity of the orofacial region’s anatomical landmarks on the radiograph is dependent on the focal trough.5–7,11,12
The focal trough is an arciform area between the radiation source and image receptor. The maxilla and mandible must be positioned in the focal trough to create a detailed and diagnostic-quality panoramic image. The focal trough determines how sharp and detailed structures will appear: for instance, anatomy and objects located within the focal trough appear distinct, while those outside the focal trough appear blurry.5,7,9,13 The focal trough may vary based on the panoramic machine, as manufacturers have designed different models to accommodate varying shapes and sizes of maxillary and mandibular arches.5,13 To ensure the focal trough replicates the shape of the arches, panoramic machines use a continuously moving rotation center. The rotation center is the axis on which the radiation source and image receptor rotate, and it changes during the exposure, allowing the focal trough to match the shape of the maxillary and mandibular arches.5,9,11
Because the radiation source and image receptor rotate around the patient’s head in opposite directions, imaging different areas of the body at a time, the resulting panorex is a composite of multiple images. These include single real, double real and ghost images. A single real image is produced for structures that are penetrated once by the X-ray beam. These structures are located between the image receptor and rotation center of the X-ray beam.5,9,10,13,14 Anatomical structures that produce single real images on a panoramic radiograph include each zygomatic bone and condyle, as well as the dentition. A double real image is produced for structures that are penetrated twice by the X-ray beam.5,9 These portray a single anatomical landmark or object located at the midline of the body and appear twice on the radiograph. Anatomical structures that produce double real images include the hard palate, epiglottis, cervical spine and hyoid bone.5,9,10
Ghost images are produced when structures or objects are located between the radiation source and rotation center.9,14 These structures and objects are positioned outside the focal trough. Ghost images are similar to the actual structure or object, but are blurry and appear higher on the opposite side of the radiograph; however, the structures or objects that produce ghost images may also appear on the panorex as a real image.5,7,9,10,14 Ghost images may include metal objects not removed prior to the exposure, such as earrings and hearing aids.5,9 Anatomical structures may also produce ghost images, which include the inferior border of the mandible, cervical spine and hyoid bone.10,13
PANORAMIC IMAGING TECHNIQUE
Due to the focal trough individualized benchmarking, a panoramic radiograph’s diagnostic quality is dependent on using correct imaging technique. Exposing a panorex requires the clinician to prepare the machine and patient, as well as correctly position the patient. Proper preparation and positioning are essential to preventing errors.5,7,9,11,12,15 Similar preparation and positioning techniques apply to all machines. Practitioners should be knowledgeable about the machine in their office and follow the manufacturer’s instructions.5
 Prior to the exposure, the panoramic machine should be prepared with the proper infection control barriers. The clinician should set the correct exposure settings based on the patient’s size and adjust the height of the machine according to the patient’s height.5,11,12,15 Depending on the type of image receptor, the imaging software is opened to activate the machine if using direct digital imaging, or loaded with either extraoral film or a photostimulable phosphor plate.15 Once the machine is ready for the exposure, the clinician should explain the radiographic procedure and have the patient remove all metal objects from the head and neck region, including earrings, eyeglasses, hearing aids and removable intraoral prostheses. The patient should be draped with a double-sided lead apron without a thyroid collar.5,7,11,12
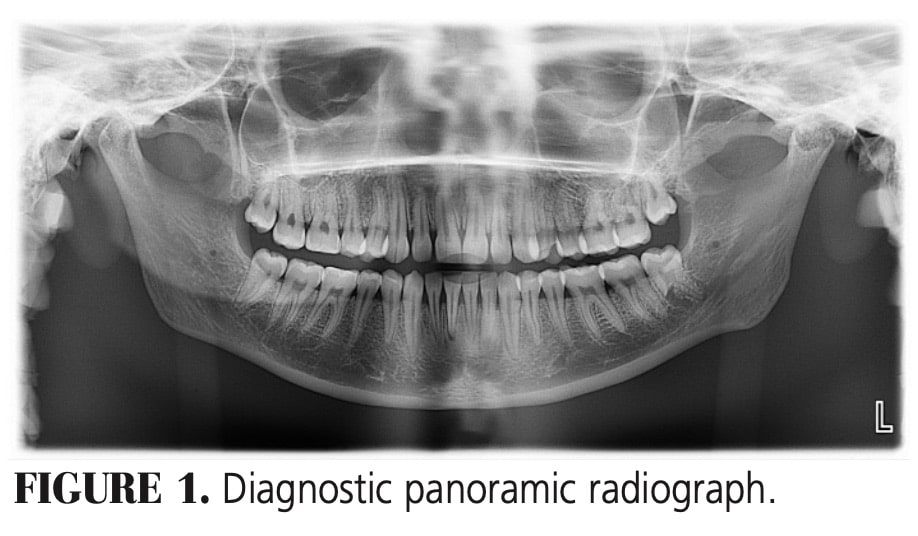
The clinician next assists the patient into the machine. Depending on mobility, patients may either stand or sit as straight as possible, with shoulders relaxed while holding onto the handlebars.5,7,9,11,12 The provider should ensure the machine will rotate around the patient without hitting the shoulders.9,12,15 If needed, a patient may forgo the handlebars, or cross his or her arms and hold on to the handlebars with opposite hands. The patient should place the incisal edges of the maxillary and mandibular anterior teeth in the groove of the bite block, and rest the chin on the chin rest.9,11,12 The operator should align the patient’s head with respect to two planes, the midsagittal and Frankfort planes. The patient’s midsagittal plane, which runs down the middle of the patient’s face dividing it into two equal parts, should be positioned perpendicular to the floor. The patient’s Frankfort plane, which runs from the opening of the ear canal to the lower portion of the eye, should be positioned parallel to the floor. The patient’s tongue should rest on the hard palate with lips closed around the bite block. The clinician should remind the patient to remain stationary until the entire exposure is complete.5,7,11,12,15 After the exposure, the image should be evaluated for diagnostic quality — a diagnostic panorex is one of optimal density and contrast that demonstrates an accurate representation of the orofacial region (Figure 1).5,12

IMAGING ERRORS
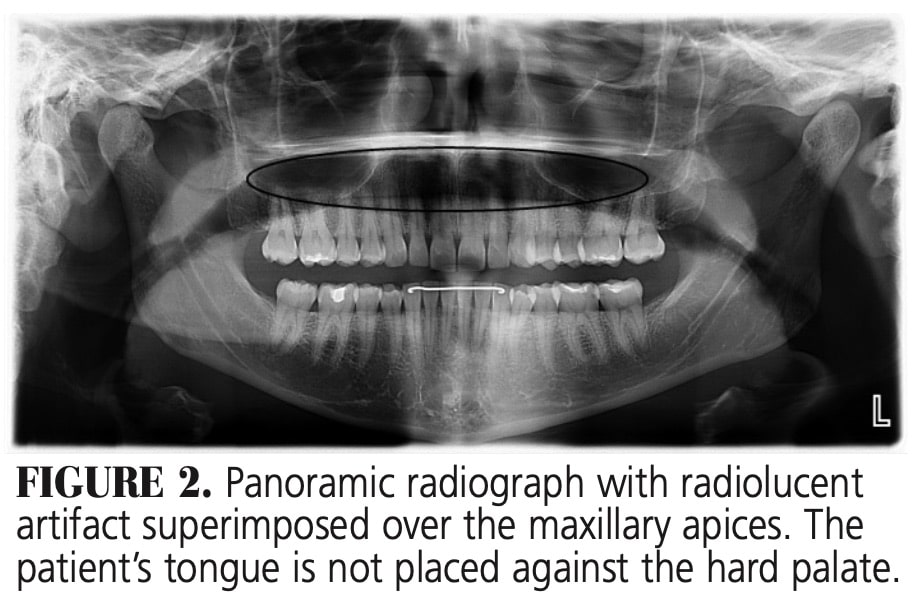
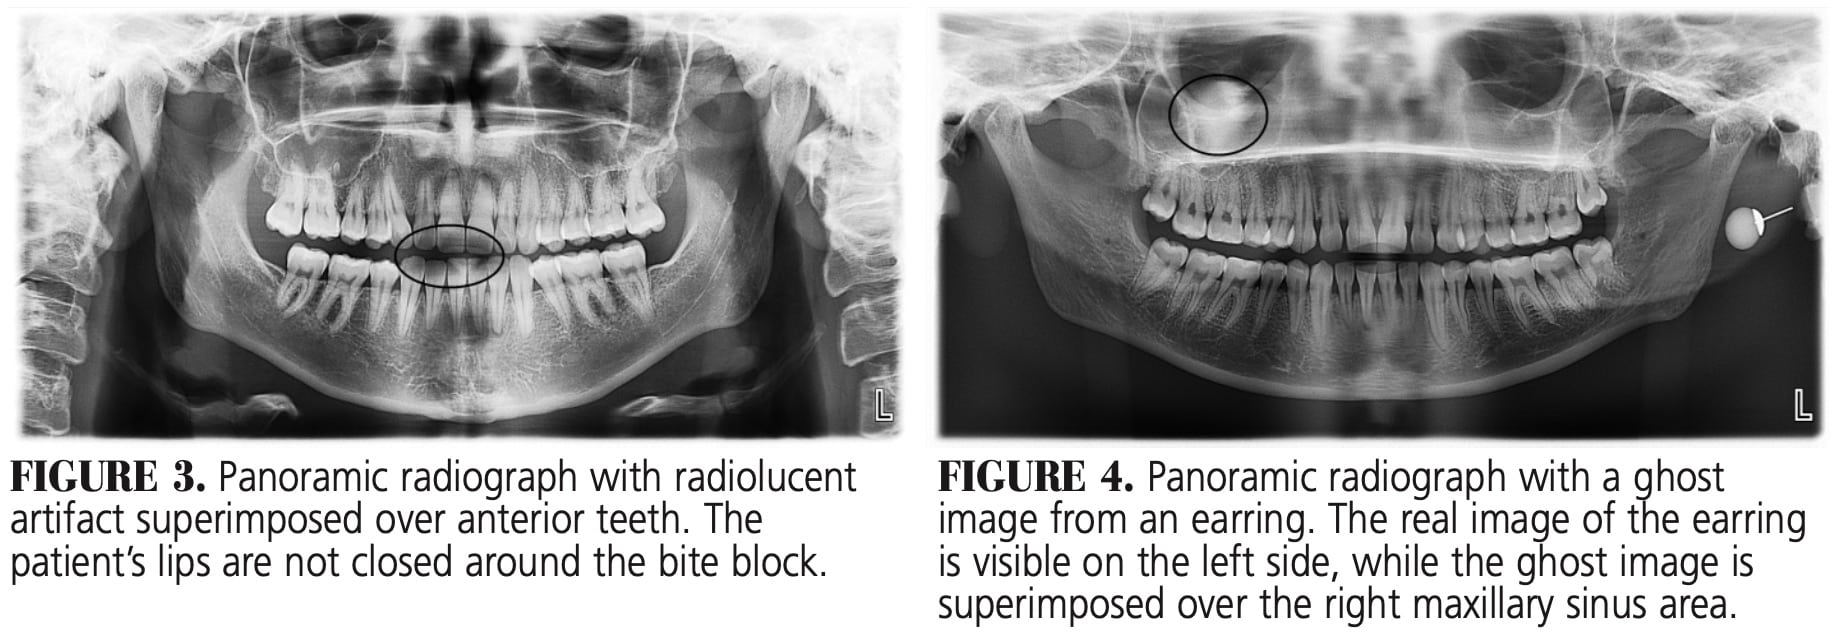
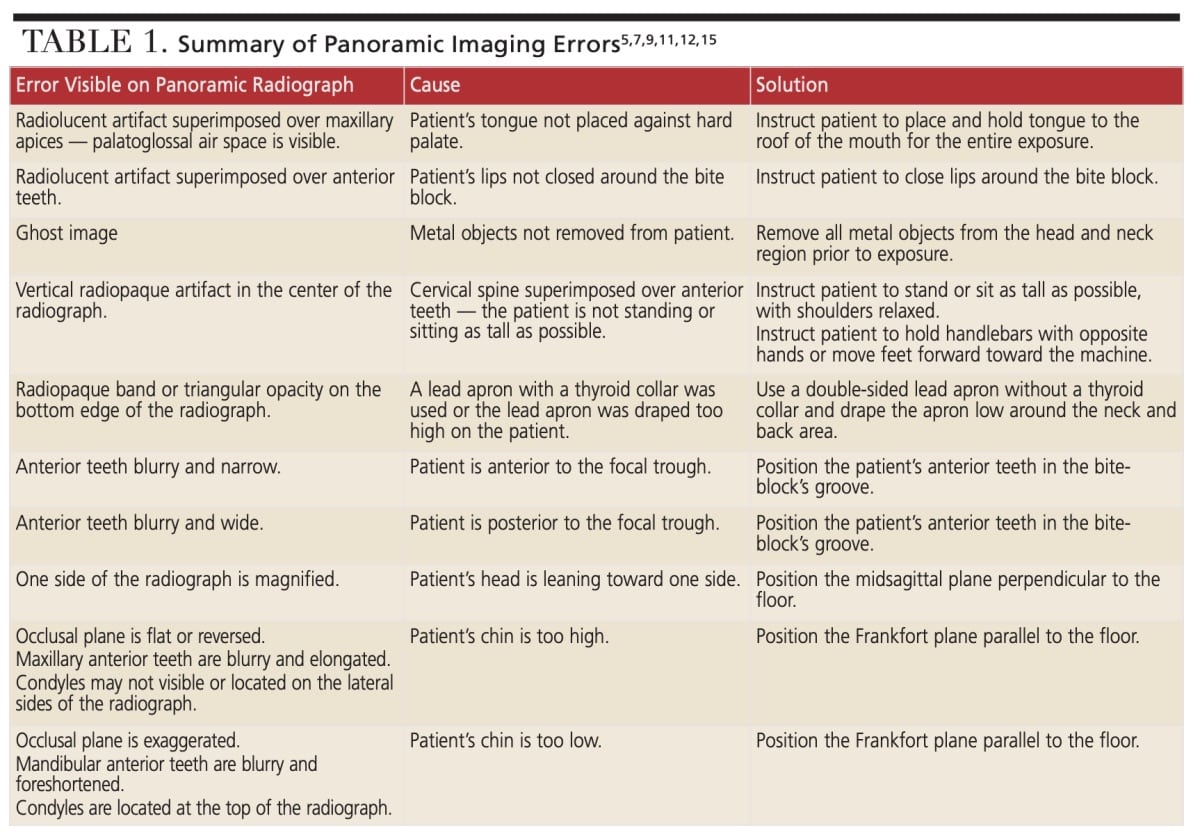
Errors visible on a panoramic radiograph can result from the improper preparation and positioning of a patient. Patient preparation errors can result in radiolucent and radiopaque artifacts. A patient who does not fully place his or her tongue to the roof of the mouth will cause a radiolucent band to be superimposed of the apices of the maxillary teeth. Figure 2 shows this radiolucent band, or palatoglossal air space. A radiolucent artifact will superimpose over the anterior teeth if the patient’s lips are not closed around the bite block (Figure 3). Failure to remove metal objects from the patient’s head and neck region will cause a ghost image to appear on the radiograph.5,7,9,11,12,15 Figure 4 shows the real image of an earring on the left side of the radiograph, with the ghost image superimposed over the right maxillary sinus region. Anatomy may also produce ghost images.10,12,13 The cervical spine will produce a vertical radiopaque band in the center of the image when the patient does not stand as tall as possible.5,9,12,15 Figure 5 shows a ghost image of the inferior border of the mandible, as well as the cervical spine.
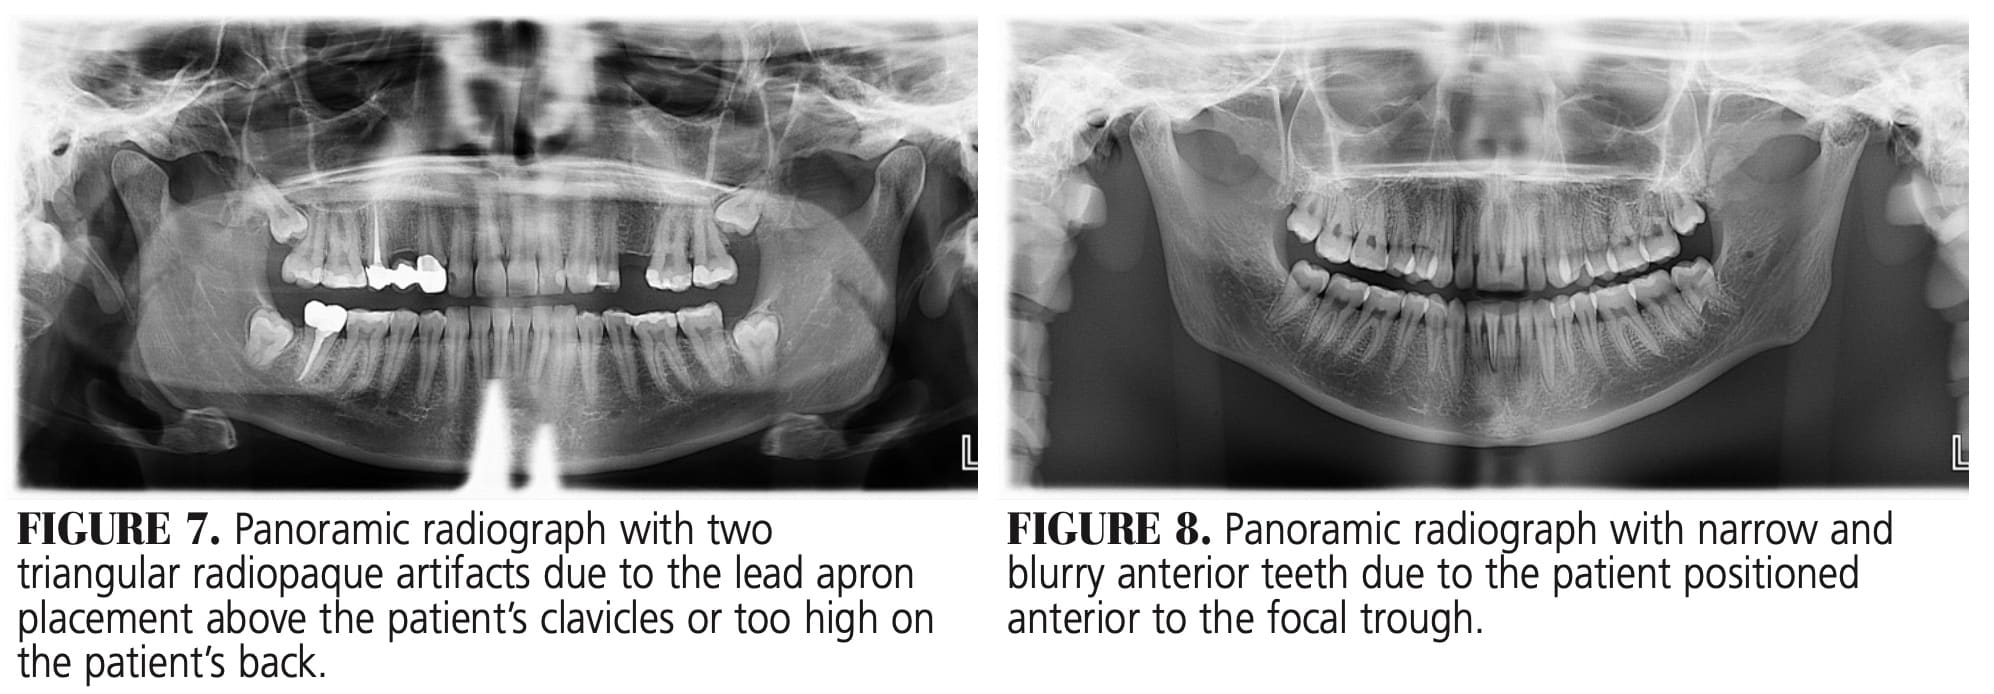 Additional radiopaque artifacts can occur with the improper use of lead aprons. Using a lead apron with a thyroid collar will produce a radiopaque artifact along the lower edge of the image, with a triangular opacity projecting upward toward the maxillary arch (Figure 6). A lead apron without a thyroid collar can also cause a smaller triangular radiopacity to appear in the center of the image near the lower edge (Figure 7).5,7,12,15 These artifacts occur when the lead apron is placed above the patient’s clavicles or too high on the patient’s back.7,12
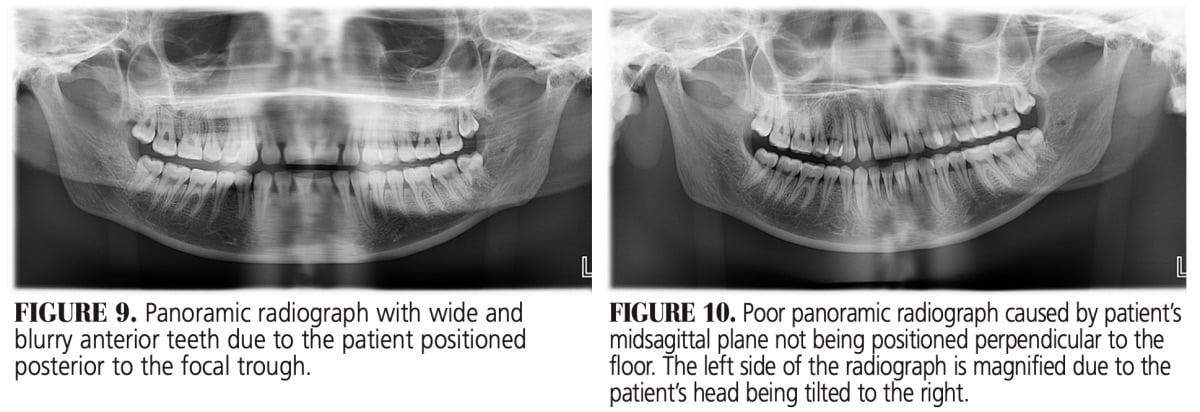
Incorrect positioning of the patient can cause panorex imaging errors. Patients can be positioned anterior or posterior to the focal trough, causing the anterior teeth to appear blurry. If a patient’s anterior teeth are in front of the groove on the bite block, the patient is positioned anterior to the focal trough; this placement will cause the anterior teeth to appear blurry and narrow (Figure 8). If the groove on the bite block is visible because the patient’s anterior teeth are too far back, the patient is positioned posterior to the focal trough. This placement will cause the anterior teeth to appear blurry and wide (Figure 9).5,7,9,11,12,15
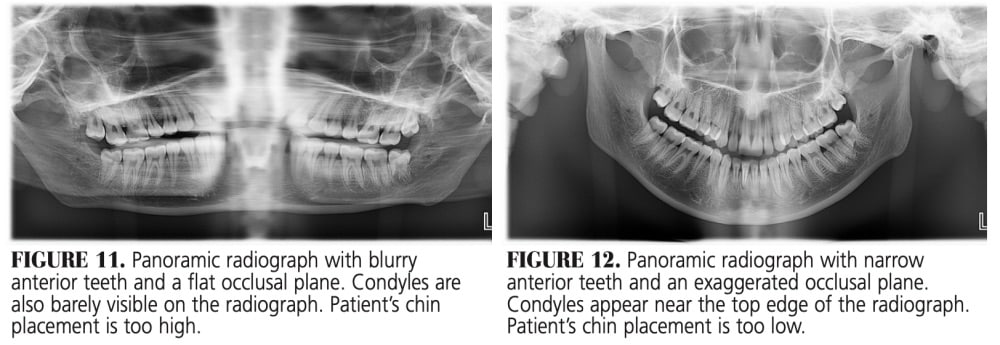
A patient’s midsagittal and Frankfort planes could also be incorrectly positioned. If the midsagittal plane is not perpendicular to the floor, the resulting image will appear magnified on one side.5,9,11,12,15 Figure 10 demonstrates magnification of the left side because the patient’s head is tilted to the right. If the Frankfort plane is not parallel to the floor, the patient’s chin will be too high or too low and will cause one dental arch to be positioned outside of the focal trough. If the chin is too high, the patient’s maxillary arch is positioned in the focal trough, but the mandibular arch is outside the focal trough. The opposite is true when the chin is too low; the maxillary arch is positioned in the focal trough while the mandibular arch is outside the focal trough.7,11,12 When a patient’s chin is too high, the maxillary anterior teeth will appear blurry and elongated, the condyles may or may not appear on the image, and the occlusal plane appears flat or reversed (Figure 11). When a patient’s chin is too low, the mandibular anterior teeth appear blurry and foreshortened, the condyles appear at the top of the image, and the occlusal plane is exaggerated (Figure 12).5,7,9,11,12,15
![]() CLINICAL IMPLICATIONS
CLINICAL IMPLICATIONS
Clinicians can prevent imaging errors by following proper radiographic technique. Studies have found 64% to 98% of panoramic radiographs evaluated had one or more errors.16–19 The most common error observed was the air space superimposed over the maxillary apices. Errors will distort a radiograph.5 The nondiagnostic quality of these images ranged from 10% to 40%.18,19 Nondiagnostic radiographs may result in exposing patients unnecessarily to additional radiation.16
Individuals in the United States have an annual radiation dose of approximately 6.2 mSv, with 3.0 mSv of this annual dose attributed to medical radiation.20 When comparing radiation exposure of digital dental radiographs, a panorex provides less exposure than a full-mouth series. Four digital bitewings using rectangular collimation provides a radiation dose of 5 µSv. While these radiographic examinations expose patients to small amounts of radiation, clinicians should ensure images are of diagnostic quality to prevent additional radiation exposure.8 A retake should only occur if the image is nondiagnostic and not to correct minor errors.5
![]() CONCLUSION
CONCLUSION
Panoramic radiography offers a wide array of benefits, including a large field of view, high patient compliance, and minimal radiation exposure. However, panorex imaging can present challenges. The images lack the fine detail of intraoral radiographs, and errors in patient preparation and positioning can distort the image.5,7,9,11,12,15,18,19 Clinicians should be knowledgeable of correct technique and follow manufacturer instructions to produce diagnostic-quality panoramic radiographs.5 Although the radiation dose is low in dental radiography, clinicians should make every effort to minimize a patient’s radiation exposure.8,21
References
- Iannucci JM, Howerton LJ. Radiation history. In: Dental Radiography: Principles and Techniques. 5th ed. St. Louis: Elsevier; 2017:2–7.
- Iannucci JM, Howerton LJ. Introduction to dental imaging examinations. In: Dental Radiography: Principles and Techniques. 5th ed. St. Louis: Elsevier; 2017:148–151.
- Stabulas-Savage JJ. Intraoral radiographic technique: the paralleling method. In: Frommer’s Radiology for the Dental Professional. 10th ed. St. Louis: Elsevier; 2019:80–106.
- Stabulas-Savage JJ. Extraoral techniques. In: Frommer’s Radiology for the Dental Professional. 10th ed. St. Louis: Elsevier; 2019:158–165.
- Iannucci JM, Howerton LJ. Panoramic imaging. In: Dental Radiography: Principles and Techniques. 5th ed. St. Louis: Elsevier; 2017:244–259.
- Vandenberghe B, Jacobs R, Bosmans H. Modern dental imaging: a review of the current technology and clinical applications in dental practice. Eur Radiol. 2010;20:2637–2655.
- Stabulas-Savage JJ. Panoramic radiography. In: Frommer’s Radiology for the Dental Professional. 10th ed. St. Louis: Elsevier; 2019:140–157.
- American Dental Association Council on Scientific Affairs: Dental Radiographic Examinations: Recommendations for Patient Selection and Limiting Radiation Exposure. Available at: ada.org/~/media/ADA/Member%20Center/FIles/Dental_Radiographic_Examinations_2012.pdf. Accessed September 1, 2020.
- Legg L. Panoramic radiography. Radiol Technol. 2005;76:197–210.
- Langlais RP, Langland OE, Nortjé CJ. Normal panoramic anatomy. In: Diagnostic Imaging of the Jaws. Malvern, Pa: Williams & Wilkins; 1995:87–102.
- Thomson EM, Johnson ON. Panoramic radiography. In: Essentials of Dental Radiography for Dental Assistants and Hygienists. 9th ed. Upper Saddle River, NJ: Pearson; 2012:377–402.
- Scarfe WC, Williamson GF. Practical panoramic imaging. Available at: dentalcare.com/en-us/professional-education/ce-courses/ce589. Accessed September 1, 2020.
- Pawar RR, Makdissi J. The role of focal block (trough/plane) in panoramic radiography: why do some structures appear blurred out on these images? Radiography (Lond). 2014;20:167–170.
- McDavid WD, Langlais RP, Welander U, Morris CR. Real, double, and ghost images in rotational panoramic radiography. Dentomaxillofac Radiol. 1983;12:122–128.
- Withers S, Heyde M. Panoramic radiographs: technique & anatomy review. Available at: dentalcare.com/en-us/professional-education/ce-courses/ce533. Accessed September 1, 2020.
- Subbulaskshmi A, Mohan N, Thiruneervannan R, Naveen S, Gokulra JS. Positioning errors in digital panoramic radiographs: a study. J Orofac Sci. 2016;8:22–26.
- Newadkar U, Chaudhari L, Khalekar Y. Common errors on panoramic radiograph: a time to reflect and review and not to sweep them under the carpet! SRM J Res Dent Sci. 2016;7:146–149.
- Peretz B, Gotler M, Kaffe I. Common errors in digital panoramic radiographs of patients with mixed dentition and patients with permanent dentition. Int J Dent. 2012;2012:1–7.
- Khator AM, Motwani MB, Choudhary AB. A study for determination of various positioning errors in digital panoramic radiography for evaluation of diagnostic image quality. Indian J Dent Res. 2017;28:666–670.
- National Council on Radiation Protection and Measurements. Ionizing Radiation Exposure of the Population of the United States. Available at: https://ncrponline.org/shop/reports/report-no-160-ionizing-radiation-exposure-of-the-population-of-the-united-states/. Accessed September 1, 2020.
- Ludlow JB. The risks of radiographic imaging. Dimensions of Dental Hygiene. 2012;10(6):56–61.
From Decisions in Dentistry. October 2020;6(9): 32-35.

