
 microgen / istock / Getty Images Plus
Complex Restorative Dentistry Aided by Digital Technology
An exploration of how digital technology can improve efficiency and predictability without compromising fundamental treatment concepts when managing complex restorative cases.
Clinically, it is important to appreciate factors that contribute to the complexity of care. These include patient-related factors, clinician-related factors and situational factors. Some of these are more easily managed than others.1 For example, oral health professionals have little control over the patient’s medical history, attitude and expectations. However, the dentist has control over acquiring the required clinical skills, controlling the number and time of appointments, using the right equipment and materials, and setting realistic expectations. While the exponential growth in digital dental technologies is astounding,2 the reassuring fact is the fundamental concepts of diagnosis and treatment planning remain valid. This article will describe how using digital technology can improve efficiency and predictability without compromising these fundamental concepts when managing complex restorative cases.
According to the American College of Prosthodontist’s Prosthodontic Diagnostic Index, the complexity of treatment for a dentate patient increases when pathology involves the coronal tooth structure in three or more sextants and the occlusal scheme needs major therapy to maintain it (with or without altering the occlusal vertical dimension or OVD).3 A number of factors can contribute to tooth pathology, such as caries, tooth surface loss from attrition, abrasion and erosion, failing restorations, fractured or cracked teeth, and parafunctional habits. It is important to first take a good history and recognize the etiology and risk factors that lead to tooth pathology, as these same factors could jeopardize treatment outcomes.4 The planned treatment or maintenance regimen should seek to eliminate or mitigate these risks.

The next step is to perform a clinical exam and create a problem list or diagnosis. From this list, it will be crucial to establish therapeutic goals such that the chosen treatment option will help achieve these aims. Some therapeutic goals could be better esthetics, improved mastication and swallowing, or speech improvements. These should be aligned with the patient’s chief complaint; otherwise, it could lead to misunderstandings between the practitioner and patient that could result in treatment failure.
Following an evidenced-based, decision-making trifecta that takes into consideration the patient, dentist and supporting literature, the treatment options should be discussed in detail to obtain informed consent before initiating therapy (Figure 1).5 In the flow chart described in Figure 1, digital technology is helpful in obtaining clinical information, especially when it comes to imaging and records. Digital dentistry is also increasingly used in treatment execution and dental laboratory procedures, as will be discussed in this article.

While preparing the treatment plan, it is important to have a working knowledge of the different restorative materials and manufacturing technologies available to the clinical team. The good news is that most traditional dental materials can be manufactured with computer aided manufacturing, such as polymer, metals, ceramics and composites.6 When selecting the material, factor in the tooth preparation parameters, luting system, fracture toughness for brittle materials, yield strength for metal alloys, surface characteristics, light reflection, and polishability of the material.
Ceramics have become increasingly popular due to their esthetic and improved physical properties.7 Among the various ceramic material, zirconia is the most popular and widely used material currently.8 Yet it is important to be aware that within the zirconia family there are different types available, and with the newer generations, improved esthetic properties come at the expense of reduced transformation toughening and fracture resistance. These newer generation zirconia materials are recommended for the anterior dentition, and although their fracture toughness is reduced compared to traditional coping zirconia, they are slightly stronger than lithium disilicate.6
DIGITAL WORKFLOW
The initial clinical evaluation starts with a conversation about the patient’s history and goals for treatment, followed by intraoral and extraoral imaging. Intraoral images should be made fully retracted in order to visualize at least the mesial part of the first molars.
For the workflow described, the authors recommend the following photographic images:
Sequence of the intraoral photographs:
- Frontal view with the teeth together in maximal intercuspal position (MIP)
- Frontal view with teeth slightly apart, approximately 2 mm
- Frontal view with a black contraster of the maxillary and mandibular teeth
- Occlusal view of the maxillary and mandibular arches displaying up to the second molars
For the extraoral pictures, the authors prefer not to take them in the dental chair, but instead have the patient seated in a regular chair and have two mounted speedlight or strobe flashes as light sources.
- The initial photograph is a full face, head, neck and shoulders without displaying the teeth in a relaxed position
- The same pose as the initial picture with a full smile, and then with retractors to display the teeth and gingiva
- The second set of extraoral photographs is a full smile close-up where only the entire head is visible
- Next would be a full smile close-up where only the teeth in relation to the lip structures are visible
- The last set of images is a full smile of the patient covering the smiling face from a 45º angle facing the light boxes and having the canine in the center as a reference point; images are made for the right and left sides
The resulting imagery can be evaluated along with the exam findings to start treatment planning. In addition to the photographic record, a complete mouth radiographic series is completed in conjunction with a cone beam computed tomography if any surgical procedures are anticipated.
Three types of software will be used in the following treatment:
- Smile design software that creates realistic two-dimensional (2D) smiles on photographs
- Non-dental-specific, computer aided design (CAD) software that will accurately convert the 2D smile into a three-dimensional (3D) file
- Dental-specific CAD software that will be used to design the teeth and create the occlusion.
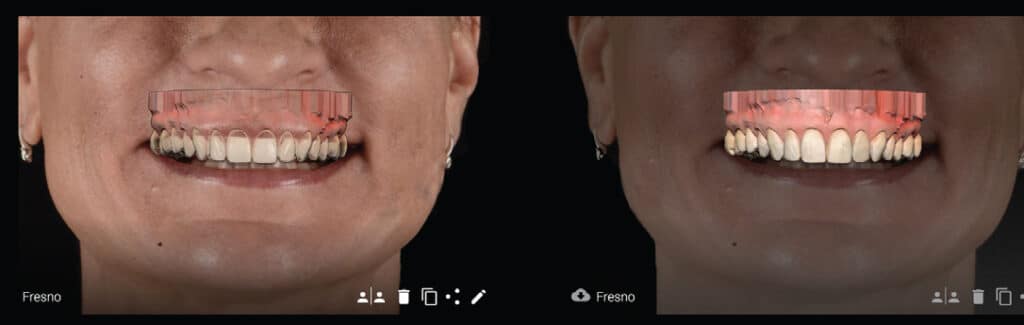
The next step will be 2D smile design. This allows the patient to visualize the desired goal and serves as a communication tool between the dentist and patient to facilitate adjustments to the suggested design. This is analogous to when an architect shows a client the initial drawings of a plan. The smile design software with realistic rendering capabilities creates a new smile on a full-face picture in less than 10 minutes (Figure 2).
The full-face photograph should have a black background and must capture the full face with a closed or slightly open smile. Based on this picture and identification markers that can be used to make adjustments (e.g., smile and lip line, tooth height and width), the smile design program’s artificial intelligence software is able to generate various maxillary smile libraries that will display teeth from the right second molar to the left second molar. These 2D teeth libraries will be projected onto the patient’s image to showcase a certain look based on the selected library. Once the patient and dentist agree on a tooth style from the library, the software offers the user the ability to download the full library or outsource the design to a dental laboratory.
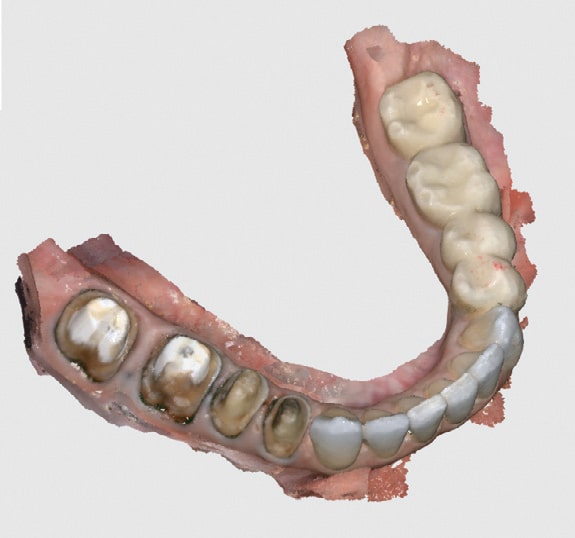
An intraoral scan of the patient’s oral cavity is the next step. An intraoral scanner is used to capture optical images of the teeth and intraoral tissues9 so the record includes a scan of each arch and the respective occlusion. The scanner can directly export .stl, .ply or .obJ files into the computer or saves them to the cloud, where they can be downloaded by the dental laboratory if desired.
Depending on the proposed treatment plan, the scan for the occlusion can be in MIP or at an increased OVD position. For the latter, the patient is asked to stay in repose (rest position), or to separate the teeth at a desired vertical dimension. The method to capture the vertical dimension in an open position with an intraoral scan is as follows. After capturing the occlusal registration in MIP, the patient is asked to separate his or her teeth to the desired OVD, as determined by diagnostic planning using esthetic and phonetic approaches. At this new position, a vinvl polysiloxane occlusal registration medium is introduced on the left and right sides as a discontinuous record. The new occlusal relationship will be scanned on the right side, with the left interocclusal record in place and, similarly, the left side will be scanned with the right interocclusal record in place.
RESTORATION DESIGN
If designing the restorations at MIP: In this phase, the patient-approved 2D smile design will be converted to a 3D file using a non-dental-specific CAD software. The exported smile design will be aligned on the virtual image of the maxillary arch in the CAD software. The software allows the designer to overlay the scan and create a transparent 3D image file using a background picture (the previously created ideal 2D file is used for the background image). This way, a 3D model will match the approved initial design that was generated in the original smile design software (Figure 3).
The reason for doing the smile design in two steps is because the original 2D smile design looks realistic and works well for patient presentation and communication purposes. However, this is a 2D image and thus not suitable for design and manufacturing purposes. The second software converts the 2D image into a CAD-recognized 3D file that can be used for restoration design.
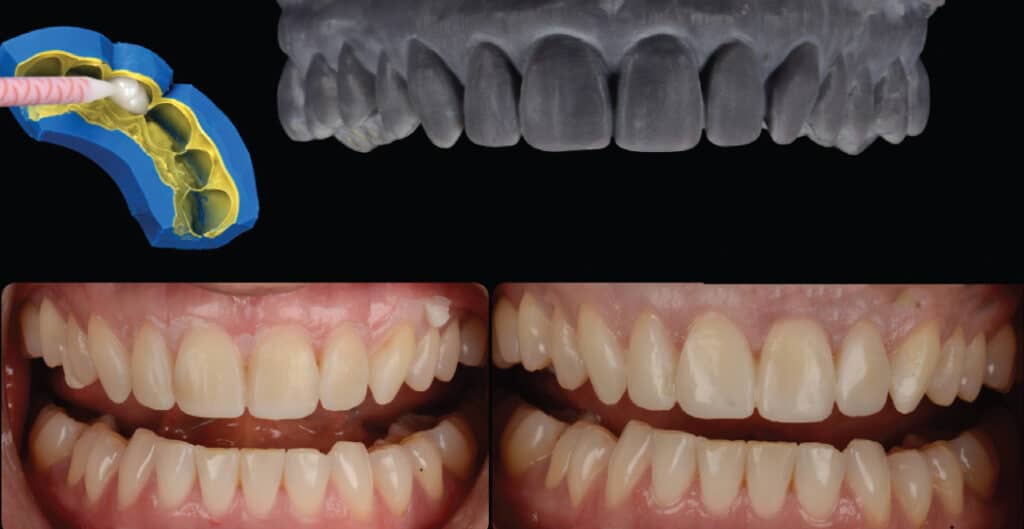
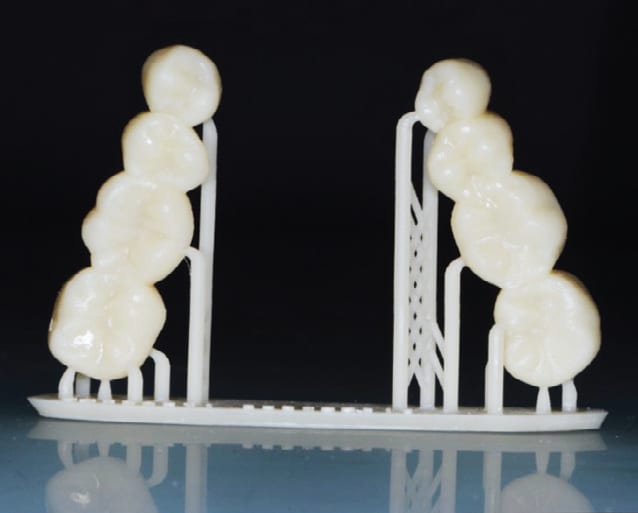
Since the original smile design software does not export the mandibular arch library, the dentist has to create the mandibular arch in a third, dental-specific CAD software. To achieve this, the 3D file of the maxillary arch that is redesigned in the non-dental CAD software, along with the mandibular arch scan, are exported into the dental-specific CAD software. It is important that the occlusal relationship is not changed during this process. The mandibular arch will be designed to fit the maxillary occlusal plane. Once completed, the maxillary and mandibular arch files can be exported as a solid cast that can be used for a mock-up using the direct intraoral technique (Figure 4), or used to 3D print acrylic resin shells for provisional restorations (Figure 5). It is recommended the provisional shells be 3D printed in six sextants (the maxillary right posterior, maxillary anterior and maxillary left posterior, mandibular left posterior, mandibular anterior, and mandibular right posterior).
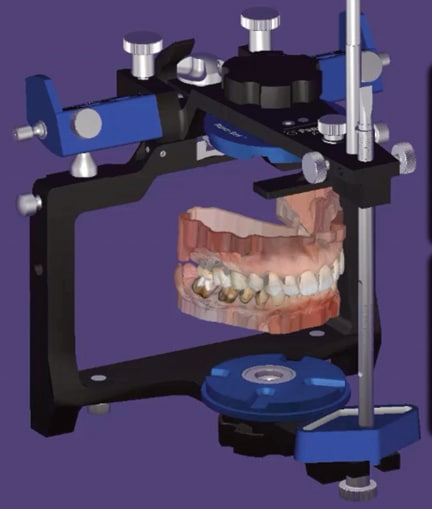
If designing restorations at a new OVD: Here, the authors recommend the process commence directly in the dental design software (which bypasses the intermediate step of converting the 2D smile to a 3D smile in the non-dental-specific software). The maxillary and mandibular arch scans will be imported at the new increased OVD relationship. The OVD can also be further increased or decreased in the software’s articulation function (Figure 6).10 Once this is established, the software’s smile library can be chosen and the 2D smile design image can also be imported as a reference to select similar shaped teeth from the library.
Once the teeth are designed, the CAD software allows small or large adjustments to the shape. It also displays occlusal interferences and is able to eliminate these interferences automatically. The software can generate digital files of the maxillary and mandibular arches that can be used to print solid casts for mock-ups and provisional shells, printed in six sextants.
CLINICAL WORKFLOW
The acrylic resin printed shells in sextants and solid cast used for the mock-up will be used at the initial appointment to fabricate the provisional restorations. In the authors’ experience, the solid cast used for mock-ups using the direct technique can expedite the workflow. However, the disadvantage is they have to be sectioned off and redone if impressions have to be made at another appointment. Shell provisionals can be relined and reused, but need more chairtime to fabricate and insert. Both techniques can be used together. For example, the anterior sextant provisionals can be made using a mock-up silicone index and posterior provisional teeth made by relining the printed acrylic resin shells.

Once the provisionals are in place, it is recommended the final impression scan be completed using the advantage of the sextant technique (Figure 7). The maxillary right posterior sextant will be scanned without provisionals and with the maxillary left posterior sextant provisionals in place — and vice versa. The anterior sextants prepared teeth will be scanned with the posterior sextants provisionals in place, as well. All scanned sextants will then be stitched together in the software. In doing so, maxillary and mandibular scans with provisionals — and a second scan of the prepared abutments without provisionals — will be captured at the desired OVD. Another advantage of this technique is the full-arch scans do not need to be completed in one appointment, which might better suit patients who cannot tolerate a lengthy dental appointment.
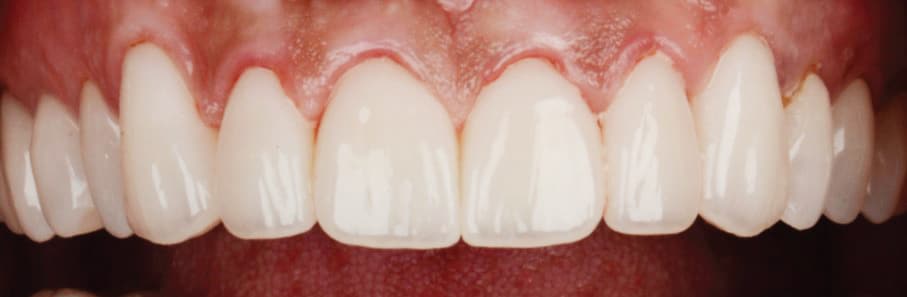
The complete-arch scans of the prepared teeth and provisional will be transferred to the dental laboratory, where a poly(methyl methacrylate) second set of milled provisionals can be fabricated. In order to create more predictability in the final restorations, it is important not to skip this step. Once the laboratory-generated milled provisionals are inserted, adjustments can be made intraorally if necessary (Figure 8). The patient can use these poly(methyl methacrylate) prototypes to evaluate the function and esthetics and provide feedback. If adjustments are needed for these provisionals, an additive or subtractive method can be used. Once the patient is satisfied with the adjustments to the milled provisionals, they can be rescanned and sent to the laboratory for fabrication of the definitive restorations. The laboratory can mill the final restorations as per the material selected during work authorization (Figure 9).
CONCLUSION
As clinicians master current trends in digital dentistry — such as those described here — they should also be aware of groundbreaking digital technologies on the horizon. In addition to even more prominent roles for artificial intelligence and emerging nanotechnologies, augmented reality and virtual reality are poised to not only change the way providers learn, but also the practice of dentistry itself.11,12
References
- Rich B, Goldstein GR. New paradigms in prosthodontic treatment planning: a literature review. J Prosthet Dent. 2002;88:208–214.
- Rekow ED. Digital dentistry: The new state of the art — is it disruptive or destructive? Dent Mater. 2020;36:9–24.
- McGarry TJ, Nimmo A, Skiba JF, et al. Classification system for the completely dentate patient. J Prosthodont. 2004;13:73–82.
- Laske M, Opdam NJM, Bronkhorst EM, Braspenning JCC, Huysmans MCDNJM. Risk factors for dental restoration survival: A practice-based study. J Dent Res. 2019;98:414–422.
- Elangovan S, Guzman-Armstrong S, Marshall TA, Johnsen DC. Clinical decision making in the era of evidence-based dentistry. J Am Dent Assoc. 2018;149:745–747.
- Sulaiman TA. Materials in digital dentistry — A review. J Esthet Restor Dent. 2020;32:171–181.
- Zhang Y, Kelly JR. Dental ceramics for restoration and metal veneering. Dent Clin North Am. 2017;61:797–819.
- Lawson NC, Frazier K, Bedran-Russo AK, Khajotia S, Park J, Urquhart O. Council on Scientific Affairs. Zirconia restorations: An American Dental Association Clinical Evaluators Panel survey. J Am Dent Assoc. 2021;152:80–81.e2.
- Ender A, Zimmermann M, Mehl A. Accuracy of complete-and partial-arch impressions of actual intraoral scanning systems in vitro. Int J Comput Dent. 2019;22:11–19.
- Hsu MR, Driscoll CF, Romberg E, Masri R. Accuracy of dynamic virtual articulation: Trueness and precision. J Prosthodont. 2019;28:436–443.
- Joda T, Gallucci GO, Wismeijer D, Zitzmann NU. Augmented and virtual reality in dental medicine: A systematic review. Comput Biol Med. 2019;108:93–100.
- Shan T, Tay FR, Gu L. Application of artificial intelligence in dentistry. J Dent Res. 2021;100:232–244.
Amit Punj, DMD, MCR, FACP, has no commercial conflicts of interest to disclose. Paul Zhivago, DDS, discloses consulting for SprintRay, Medit, ZBrush, exocad and BlueSkyBio.
From Decisions in Dentistry. September 2022;8(9)8-10,13.
