

Bleaching and the Diagnosis of Internal Resorption
A case report of bleaching a blackened tooth that ultimately resulted in treatment for internal resorption.
A case report of bleaching a blackened tooth that ultimately resulted in treatment for internal resorption
Bleaching all teeth, or a single dark tooth, can be a rewarding experience for both the dentist and patient. It is important to determine a proper diagnosis for the cause of discoloration, of course — which includes preoperative radiographic imaging and appropriate pulp testing for non-endodontically treated teeth.1 Occasionally, there are some unusual discolorations that dentists should carefully evaluate prior to bleaching, whether using internal bleaching or external bleaching techniques. The following case report demonstrates one variation in the assessment and treatment of a black discoloration that was ultimately diagnosed as internal resorption.
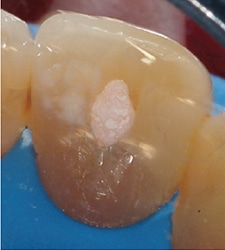
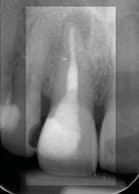
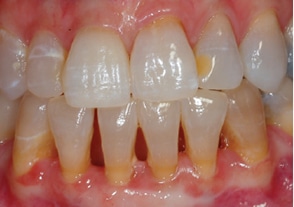
An asymptomatic 53-year-old woman presented with tetracycline-stained teeth and a darkened cervical area of tooth #8. The patient had received endodontic therapy for acute apical abscess one month prior. The tooth was restored provisionally, yet a black area remained near the gingiva on the distofacial surface of the tooth (Figure 1). There were several possible considerations, including external resorption; however, clinically there was no cavitation probable on the external surface of the tooth. An alternate diagnosis might have been residual pulpal tissue or debris in the chamber causing external discoloration, but this cervical location of the darkness did not suggest this. Possible use of an endodontic sealer containing silver or other staining material might be a potential culprit, but the treating endodontist in this case does not use that type of sealing material. Leaving obturation or provisional restorative materials too incisively in the pulp chamber could also create discoloration.

been completed on tooth #8, but dark
black discoloration is present gingivally
on the distal portion of the tooth.
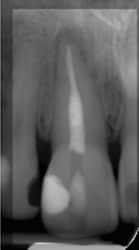
Since these were tetracycline-stained teeth, there is also the possibility that one of the analogues of tetracycline was causing a gray or black discoloration; however, usually such tetracycline discoloration would appear on both central incisors, and is more commonly a horizontal band rather than a spot. The endodontic radiographic series, including angled images, revealed no obvious resorptive process (Figure 2). Because there was no apparent external reason for the discoloration, the decision was made to remove the endodontic access and composite restorations to determine if there might be an internal cause for the discoloration.
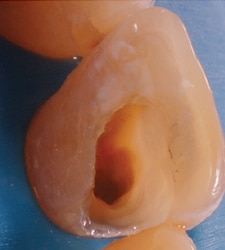
When endodontic access is more rounded than triangular, as was the case here (Figure 3), there can be concern that pulp horn tissue might have been missed. Again, however, the location of this discoloration did not align with the typical pulp chamber location. Since the location was unusual for discoloration in this previously endodontically treated tooth, exploration of the pulp chamber contents, with possible internal bleaching, was the preferred approach over external bleaching with a single-tooth bleaching tray. Generally, internal bleaching is accomplished using the “walking bleach” technique, in which 10% carbamide peroxide is placed in the pulp chamber (rather than sodium perborate or 35% hydrogen peroxide) and changed weekly.2 The other treatment option is a single internal bleaching application, followed by external bleaching in a single-tooth or full bleaching tray.
ANESTHESIA AND ISOLATION
After appropriate local anesthesia and rubber dam application, the distolingual composite and endodontic access restorations were removed. Following access enlargement and creation of an inverted triangular opening to expose the entire chamber, it was determined there were no significant residual pulpal debris, obturation components, or restorative material that might have led to discoloration; however, the area closest to the gingival portion of the preexisting distal composite was soft to a latch-type round bur excavation, and extended to the facial of the root canal obturation material (Figure 4). The clinical diagnosis was that of a resorptive defect rather than caries. Resorption has been referred to as “cancer of the tooth,” and the only treatment options are to remove all accessible softened tooth structure and chemically treat any remaining affected dentin in an attempt to halt the process.


As the nature of the resorption was undetermined (internal versus external), all soft/denatured dentin was removed, followed by treatment of the area with a cotton pellet soaked in trichloroacetic acid (TCA), using pressure for one minute. Typically, TCA is not used for internal resorption because vital odontoclastic cells have to be present to cause resorption. Once a vital resorptive pulp is removed or becomes necrotic, internal resorption ceases. Generally, application of TCA is reserved for treating external cervical resorptive lesions, as it is both caustic and hemostatic. It kills active cells and is typically used to obliterate active odontoclasts originating at the periodontium during surgical removal of external resorption.3 In this case, however, TCA was employed because the source of the internal resorption was somewhat nebulous and could have been the result of a combination of internal/microscopic external resorption below soft tissue attachment.
After all residual softened dentin resulting from this treatment was removed — and with no evident external perforation — (Figure 5), a radiograph was taken (Figure 6). In order to promote the best seal to dentin, the internal area was restored with a resin-modified glass ionomer (Figure 7). The excavated area was first conditioned with polyacrylic acid; next, the deepest portion of root area was restored with a light-cured, resin-reinforced material in shade A3.5. The remaining area up to the cavosurface margins was acid etched, primed and bonded, and ultimately restored with a composite (Figure 8 and Figure 9). Internal bleaching was not planned due to the need to restore the area of resorption. A lighter shade with minimal color was used in case the patient elected to bleach externally to remove any further discoloration.

ionomer was placed in the area of
the resorption after treatment.
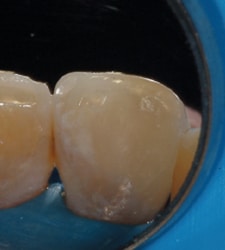
restoration was used to seal
the orifice.
DEHYDRATION CONSIDERATIONS
Radiograph of
the restored tooth will
become the baseline for future recall
radiographs.
At this time, the color outcome was undetermined due to the dehydration of the teeth from the extended time under the rubber dam (Figure 10). The area was to be reevaluated for the final shade after rehydration. The patient returned in one month to evaluate the status of the dark area after tissue rebound and teeth rehydration, resulting in a decision to bleach externally and/or replace other dark composite restorations to complement her smile.
After one month, the dark area was still visible on the distofacial of tooth #8, but did not show in a smile (Figure 11). The patient indicated interest in bleaching if no specific contraindications existed due to the resorption history for #8. The patient reported she had previously attempted external bleaching, but had only worn the trays for two weeks. Bleaching tetracycline-stained teeth requires two to 12 months of nightly treatment with 10% carbamide peroxide, with an average of three to four months of treatment.4 This extended bleaching technique has been shown to be safe and effective, with follow-up of patient’s treatment for six months of bleaching demonstrating no damage to teeth or pulps.5,6 Also, in the case of a single dark tooth, it is often best to treat the single tooth first to determine if it will have a reasonable response.7
SINGLE-TOOTH BLEACHING TRAY
This bleaching can be performed using a single-tooth bleaching tray if the decision is made to bleach from the “outside-in.” Due to the permeability of the tooth, the peroxide passes through intact enamel and dentin to the pulp in 5 to 15 minutes, which allows outside-in bleaching to be as effective as “inside-out” bleaching.8 The outside-in single-tooth bleaching technique is as follows: After an appropriate alginate impression that captures the teeth and 2 to 4 mm of attached gingiva, the resultant cast is trimmed such that the central incisors are vertical, there is no vestibule, and there is a hole in the palate or horseshoe shape. This shape best allows the vacuum former to create an optimally fitted tray.
The tray is fabricated from a thin, soft material, and allowed to sag 1 inch in the vacuum former before applying the vacuum. No reservoirs or spacers are placed, as these are not required to bleach teeth when using 10% carbamide peroxide, and will require more bleaching material — which is the main cost in the extended bleaching situations, such as tetracycline staining or nicotine staining. Also, if a single-tooth tray is to be used, scalloping will not allow the tray to remain intact for bleaching the dark tooth. The tray is trimmed such that it extends onto the tissue 2 to 4 mm on the facial, and more onto the palate to allow for tooth mold removal. Next, the teeth molds on either side of the single dark tooth are removed so the bleaching material will only be in contact with the single tooth. A normal single dark tooth usually takes at least eight weeks to see a final result. If the single tooth does not become as light as the untreated adjacent teeth, no future treatment is rendered. If the single tooth bleaches lighter than the adjacent tooth, the adjacent teeth can be treated with a typical full-arch tray to harmonize the color. Since this patient had tetracycline-stained teeth, the treatment times would be extended in both situations.
FULL-ARCH TRAY APPLICATION
In this situation, the decision was made to not use a single dark tooth bleaching application, but, rather, a full-arch tray because the tooth with the internal resorption was similar in color to the other teeth. Additionally, the decision was made to only bleach one arch at a time to evaluate progress against mandibular teeth, encourage compliance, minimize sensitivity, and avoid the occlusal problems of wearing two trays simultaneously. A nonscalloped, no-reservoir tray was fabricated and inserted for her to use on the maxillary arch. Tetracycline-stained teeth can be bleached to some extent, but the patient must commit to four to six months of nightly treatment with 10% carbamide peroxide. The unknown nature of the timeline creates a problem for fee determination. Hence, the best option is a “pay-as-you-go” approach. The first appointment includes the examination, radiographs, impression and resultant nonscalloped, no-reservoir tray, along with enough bleaching material for one month of treatment. After the first month, the patient and dentist have a general idea how much material is needed for overnight treatment.
From then on, the patient can return every month or two to purchase the amount needed to continue. The normal bleaching fee is charged for the initial appointment, and the cost of refill bleaching kits and chairtime for each subsequent appointment is the pay-as-you-go fee. In this instance, the patient was also scheduled for a gingival graft to be placed for anterior root coverage on the mandibular arch, with possible donor tissue harvested from the palate. The patient can temporarily terminate bleaching treatment if needed for graft healing time. There is no concern for the contact of the 10% carbamide peroxide with tissue because this material was originally used as an oral antiseptic to promote wound healing. The patient was provided with four refill packs of four syringes of 10% carbamide peroxide, as well as written instructions for overnight wear and a log form to record the number of treatment hours. She was instructed to continue treatment until three of the refill kits had been used, and return to the office for recall photographs, a periapical radiograph, and to replenish the material.
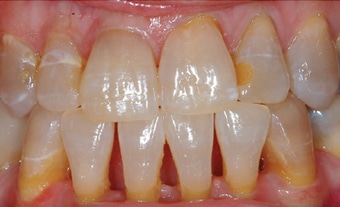
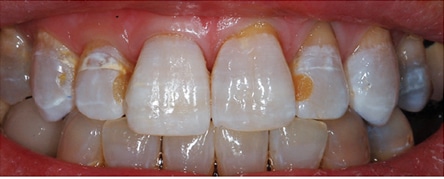
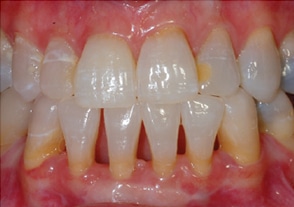
The patient completed maxillary bleaching over six months, replenishing bleaching materials as needed until the black spot was gone, the teeth were no longer changing color, and she was satisfied with the outcome (Figure 12). The patient experienced very little sensitivity and achieved a reasonable outcome — with the single dark tooth now slightly lighter than adjacent teeth. Final photographs were taken and the patient decided to pursue bleaching the mandibular arch (Figure 13). In previous bleaching research, only about 50% of patients elected to bleach their mandibular arch, even if the maxillary arch was successful and the treatment was free. Hence, it is advisable for the dental office to have a single-arch bleaching fee.
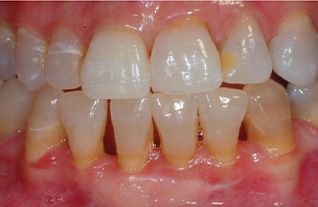
A mandibular impression was made and a nonscalloped, no-reservoir tray fabricated for the mandibular arch. The patient bleached in the same manner as with the maxillary arch for four months. She had more sensitivity on the mandibular arch and had to limit the bleaching to every third night, but was able to successfully finish (Figure 14). Options for treating sensitivity include potassium nitrate in the bleaching material, potassium nitrate used in the tray for 10 to 30 minutes, and potassium nitrate applied through a toothpaste during treatment.9,10 The outcome was acceptable to the patient, with some yellow remaining at free gingival margin in the roots of the teeth. Since the root dentin does not respond to bleaching as does dentin in the anatomical crown, this area was not expected to change any further. The smile analysis conducted at the beginning of treatment indicated this area does not show. Interestingly, in spite of the reasonable bleaching of the teeth, the patient elected not to replace the composite on tooth #10. She was happy with the smile “as is,” and pleased with the bleaching results. A note was sent to the referring endodontist, with the recommendation to evaluate tooth #8 for any future radiographic changes at six months and yearly for several years.
CONCLUSION
This presentation is a multifaceted treatment that demonstrates several major principles. Dark areas that are otherwise unexplained on endodontically treated teeth might best be addressed by entering the pulp chamber to determine and address the etiology. Due to the permeable nature of the tooth and the small molecular size of peroxide, endodontically treated teeth can be bleached from either the outside in or inside out. Tetracycline-stained teeth can be lightened, but require extended treatment times of two to six months of overnight bleaching with 10% carbamide peroxide. A single dark tooth can best be treated by a single-tooth tray, but also can be bleached with the standard full-arch tray. If using 10% carbamide peroxide, there is no need to scallop or create reservoirs because the 10% carbamide peroxide material is designed to contact tissue, and reservoirs use more material with no better outcome. Finally, following any type of restorative repair, routine yearly recall radiographic imaging is appropriate for several years.
KEY TAKEAWAYS
- When considering bleaching, it is important to establish a proper diagnosis for the cause of discoloration.
- In this case, an asymptomatic 53-year-old patient who had received endodontic treatment one month prior presented with a darkened cervical area of tooth #8.
- With no apparent external reason for the discoloration, the decision was made to remove the endodontic access and composite restorations to determine if there might be an internal cause for the discoloration.
- Following exposure of the pulp chamber, it was determined there were no significant residual pulpal debris, obturation components, or restorative material that might have led to discoloration.
- However, the area closest to the gingival portion of the preexisting distal composite was soft to bur excavation, and extended to the facial of the root canal obturation material.
- The clinical diagnosis was that of a resorptive defect rather than caries.
REFERENCES
- Haywood VB. Pre-bleaching examination vital for optimum whitening. Compendium Cont Edu Dent. 2012;33:76–77.
- Valera MC, Camargo CH, Carvalho CA, de Oliveira LD, Camargo SE, Rodrigues CM. Effectiveness of carbamide peroxide and sodium perborate in non-vital discolored teeth. J Appl Oral Sci. 2009;17:254–261.
- Heithersay GS. Treatment of invasive cervical resorption: an analysis of results using topical application of trichloracetic acid, curettage, and restoration. Quintessence Int. 1999;30:96–110.
- Haywood VB, Sword RJ. Bleaching tetracycline-stained teeth: Considerations and recommendations for treatment. Inside Dentistry. 2018;14(1):38–44.
- Haywood VB, Leonard RH, Dickinson GL. Efficacy of six-months nightguard vital bleaching of tetracycline-stained teeth. J Esthet Dent. 1997;9:13–19.
- Leonard RH, Haywood VB, Eagle JC, et al. Nightguard vial bleaching of tetracycline-stained teeth: 54 months post treatment. J Esthet Dent. 1999;11:265–277.
- Haywood VB, DiAngelis AJ. Bleaching the single dark tooth. Inside Dentistry. 2010;6(8):42–52.
- Cooper JS, Bokmeyer TJ, Bowles WH. Penetration of the pulp chamber by carbamide peroxide bleaching agents. J Endod. 1992;18:315–317.
- Haywood VB, Caughman WF, Frazier KB, Myers ML. Tray delivery of potassium nitrate-fluoride to reduce bleaching sensitivity. Quintessence Int. 2001;32:105–109.
- Haywood VB, Cordero R, Wright K, et al. Brushing with a potassium nitrate dentifrice to reduce bleaching sensitivity. J Clin Dent. 2005;16:17–22.
Van B. Haywood, DMD, has received research, grants and other financial or material support from Ultradent Products. Brian E. Bergeron, DMD, has nothing to disclose.
Featured Image by IGOR-KARDASOV/ISTOCK/GETTY IMAGES PLUS
From Decisions in Dentistry. August 2018;4(8):20, 22–25.
