

Guide to Dental Photography
This overview will help providers understand the fundamentals of dental photography, allowing them to predictably document clinical patient images.
This overview will help providers understand the fundamentals of dental photography, allowing them to predictably document clinical patient images
Photographs are vital in communicating with patients the outward view of their smile. Imperfections that are not readily visible to the patient will be apparent in still photographs. Thus, dental photography allows the patient to visualize his or her smile and oral condition with the same acute perspective as the dentist, which helps the patient understand the rationale for recommended treatment.1Whether the use of dental photography is solely for documentation or other purposes (social media or marketing, for example), before taking any images it is essential to obtain written consent for photography, and take steps to protect patient confidentiality.2 Photographic consent can easily be added as part of the patient information documents that are completed during the new patient examination process.
Selection of the most suitable equipment for extraoral and intraoral photography requires knowledge of digital photography and can be confusing for dental practitioners due to the wide varieties of models available, including wand cameras.3 Clinicians can choose from multiple systems for dental photography that will work well for most practices. However, the digital single lens reflex (DSLR) camera is the most ideally suited for practices that wish to use photography for documentation for lectures or publications;4 DSLR technology is considered to be the system of choice for predictable dental photography.5 A DSLR camera system equipped with a macro lens (85–105 mm) and an external ring flash mounted in front of the lens is required for high-quality intraoral macrophotography (Figure 1).6
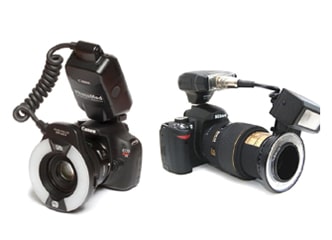
Compared to a point-and-shoot camera system, the advantages of a DSLR setup include excellent image quality, speed of operation, increased depth of field, and adaptability. While the DSLR systems were traditionally thought to be more complicated to learn, bulkier and more expensive, today’s systems are smaller and lighter, and are similar to other systems in terms of cost. The higher-end cameras can be more expensive, but such systems are not needed in the typical dental practice, as excellent results are available with less costly systems. Additionally, most photographs can be taken with a minimum of settings to simplify the process while still yielding quality results.
CAMERA SETTINGS AND ACCESSORIES
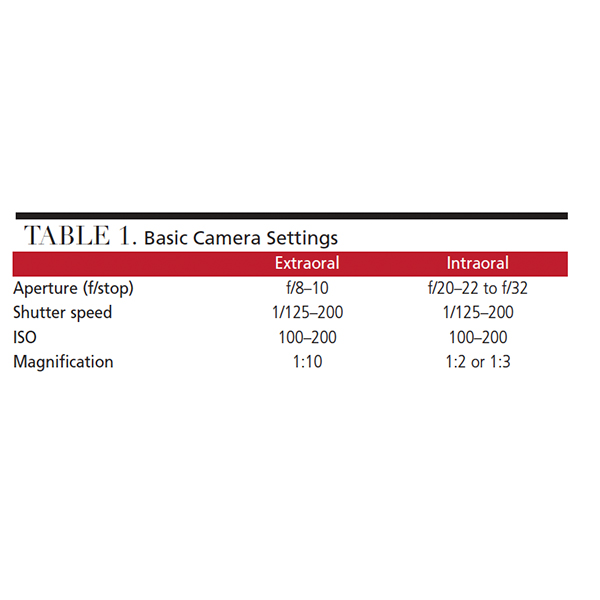
All DSLR cameras require a very specific setup for clinical dental photography.3 Proper exposure setup and flash calibration can be obtained through dental photography courses, or by purchasing a camera from companies that specialize in systems adjusted for optimal dental use (PhotoMed, Dine Corporation and Norman Camera are three examples). For an inexperienced operator, these settings can be overwhelming. The authors recommend setting the camera and lens in manual mode, as it gives full control of the following exposure features: aperture or f/stop, shutter speed, ISO and magnification (Table 1). Using these recommended settings simplifies the process greatly and will work for most clinical scenarios.
Cheek retractors greatly contribute to the final outcome of intraoral photography. These essential accessories are used to retract the lips, labial and buccal mucosa from the field of view. This allows the maximum amount of light to enter the oral cavity, thereby improving visibility. Additionally, using retractors removes miscellaneous soft tissue structures from the field of view (which would otherwise be distracting). Cheek retractors are available in clear plastic or metal, and are either single- or double-ended (Figure 2). Double-ended retractors provide both a small and large curvature. This shape allows adaptability to a variety of mouth sizes.6 Selection is a matter of preference; however, plastic retractors are less noticeable in the image should it prove impossible to eliminate it fully while framing the photograph.

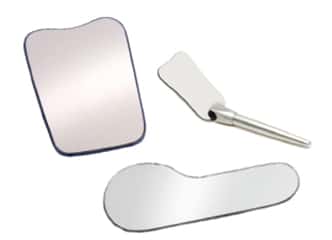
Intraoral mirrors are invaluable when taking occlusal- and buccal-view images because the photographic angle does not typically allow for capturing these photos from a direct view. Intraoral mirrors are available in several sizes, and a standard set should include buccal and occlusal mirrors (Figure 3). They are used to provide a reflected image when areas of difficult access are being photographed.3 To prevent mirror fog, it is useful to warm the mirror in a water bath, or simply ask an assistant to gently blow air across the mirror with the triple-way syringe.7 Mirrors are also available with handles, thus simplifying occlusal and buccal imaging. Their use minimizes the possibility of fingers being shown in the images (which is more likely with traditional mirror systems). To protect the reflective surfaces from potential damage, it is strongly advised to wrap mirrors separately for autoclaving purposes, and not mix them together with other instruments.
BASIC IMAGES
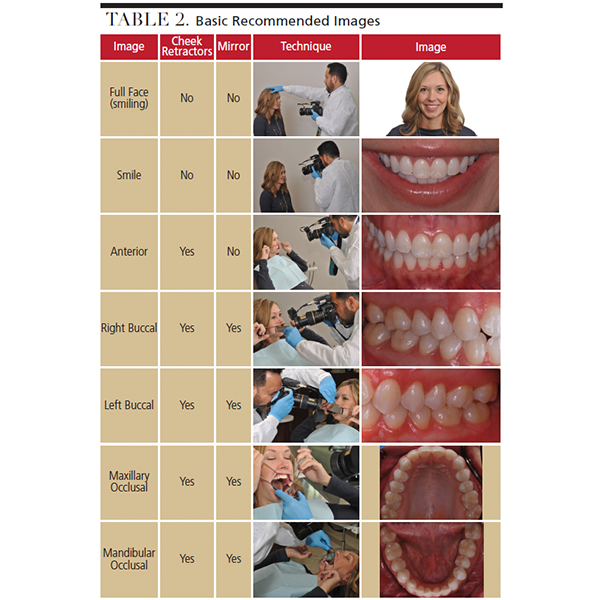
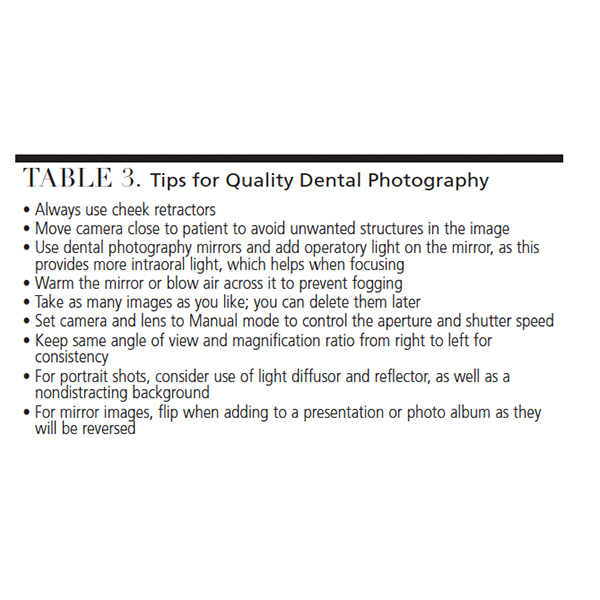
Each patient or clinical circumstance may dictate the need for specific intraoral or extraoral images. In general, practitioners should capture seven basic views to record a patient’s clinical condition during the initial visit. The authors recommend using a team of three (including the patient) to achieve an ideal outcome. The patient, photographer (dentist or other office personnel), and dental assistant should each have a role in the photo shoot. The authors recommend the patient hold the retractors for improved comfort, as they can better control the amount of tension applied. The camera and mirrors are the responsibility of the photographer in order to properly frame the image. Prior to taking the photograph, the dental assistant will dry all teeth involved, provide suction, and control mirror fog by gently blowing a light stream of air across the mirror (as noted, mirrors can also be prewarmed). The proper technique and outcomes are shown in Table 2. Additional views may be captured, as needed, based on the patient’s clinical findings or treatment provided, as well as the practitioner’s preferences. Supplemental photographic tips and suggestions are provided in Table 3.
 Ideally, the patient should be photographed in a dental chair, which should be adjusted to enable the photographer, without having to reach or bend uncomfortably, to capture an adequate view. In some cases (depending on the space available), taking the full face and smile photos may be easier if the patient is either seated in an operator chair or standing at the same height as the photographer.
For anterior, buccal and occlusal imaging, it is easier to obtain consistent views if the patient’s head is kept level, with the Frankfort plane horizontal,8 as seen in the images in Table 2. For the full-smile and anterior retracted views, some operators prefer to shoot these images from a direct horizontal approach rather than from a slightly tipped-down approach, as is illustrated in this article, but it is a purely a matter of preference. For lateral views, it is important to have the patient use the narrow end of the metal cheek retractor on the side being photographed, while using the wide end on the contralateral side. This will provide room for the lateral mirror and keep the lips from the opposite side from collapsing into the field of view. The lateral mirror should be placed distal to the second molars and used to push the cheek away from the teeth, as seen in the images in Table 2.
The mandibular occlusal view is one of the most challenging to obtain due to the tongue. In the majority of the cases, the tongue can be retracted by placing the occlusal mirror underneath it, followed by positioning the edge of the mirror distal to the second molar (see Table 2). In many cases, having the patient tip the chin slightly upward can also enhance visibility. As is the case for all mirror images, care should be taken to only include the mirror image of the teeth in the photograph.
While not illustrated in this article, the practitioner may wish to consider additional photographic alternatives, such as rapid fire or video photography in order to better visualize the lips in motion, which may differ considerably when compared to a single still image. This approach can be invaluable in smile design planning for anterior prosthodontic procedures, as static photos are often an inadequate basis for smile design, and the perception of esthetics in motion differs from the static view.4
IMAGE FORMAT
Most camera systems are set up to store images in Joint Photographic Experts Group (JPEG) format. The images are compressed, but this format is typically considered ideal for daily use, as it represents an acceptable blend between file size and image quality. However, some practitioners prefer to save the images in RAW format, as the data is uncompressed and the digital equivalent of a negative produced by a 35 mm film camera. Compared to JPEG files, RAW format offers the maximum storage of information for future processing, although this requires considerable more storage space on the digital card and computer.
A good policy is to never alter images (other than brightness/contrast or cropping/rotating) in a way that may misrepresent reality or falsify results. Such misrepresentation would be considered unethical if not appropriately disclosed. It is also recommended that original images be stored in a folder and labeled with the patient’s name, date and “original photos.” These images should never be altered in any way, although they can be duplicated should minor editing (as described above) be desired. These altered images should be saved as “edited photographs,” again, identified with the patient’s name and date.
While there is a learning curve to mastering high-quality dental photography, it is readily achievable with practice and consistent application in clinical practice.
SUMMARY
Although the rapid pace of innovations in digital photography often confounds dental professionals, high-quality, accurate clinical photographs can easily be obtained by appropriately trained staff using the proper equipment, settings and technique. Understanding the basics of dental photography — including equipment and technique — and properly applying these fundamentals will help dental teams document consistent, and clinically useful, dental photographic records.
KEY TAKEAWAYS
- Dental photography allows the patient to visualize his or her smile and oral condition with the same acute perspective as the dentist, which helps the patient understand the rationale for recommended treatment.1
- Before taking any images, clinicians should obtain written consent for photography, and take steps to protect patient confidentiality.
- A digital single lens reflex (DSLR) camera is ideally suited for practices that wish to use photography for documentation for lectures or publications.4
- Compared to a point-and-shoot camera, the advantages of a DSLR setup include excellent image quality, speed of operation, increased depth of field, and adaptability.
- All DSLR cameras require a very specific setup for clinical photography,3 as proper exposure setup and flash calibration are essential.
- Cheek retractors are key accessories that help retract the lips, labial and buccal mucosa from the field of view.
- Intraoral mirrors are invaluable when taking occlusal- and buccal-view images because the photographic angle does not typically allow for capturing these photos from a direct view.
- As a general rule, practitioners should take seven basic views to record a patient’s clinical condition during the initial visit.
- Original images should be stored in a folder and labeled with the patient’s name and date, and marked as “original photos.”
REFERENCES
- Ward DH. The vision of digital dental photography. Dent Today. 2007;26:100,102,104–105.
- Ahmad I. Digital dental photography. Part 2: purposes and uses. Br Dent J. 2009;206:459–464.
- Batista T, Coehlo R, Ferreira M, Chaves M. Digital photography in dentistry: Techniques and clinical importance. Available at: https://www.ortodoncia.ws/ publicaciones/2011/art-27/. Accessed October 31, 2018.
- Coachman C, Calamita MA, Sesma N. Dymamic documentation of the smile and the 2D/3D digital smile design process. Int J Periodont Restor Dent. 2017;37:183–193.
- Terry DA, Snow SR, McLaren EA. Contemporary dental photography: selection and application. Compend Contin Educ Dent. 2008;29:432–449.
- Manjunath SG, Raju Ragavendra T, Sowmya K, Jayalaksshmi K. Photography in clinical dentistry — a review. Int J Dent Clinics. 2011;3:40–43.
- Mahn E. Clinical digital photography. Part 1 equipment and basic documentation. Int Dent Australian Ed. 2013;3:18–26.
- Pani S. A review on clinical digital photography. Int J Appl Res. 2017;3:10–17.
The authors have no commercial conflicts of interest to disclose.
From Decisions in Dentistry. December 2018;4(12):22—25.
