

Cementing Porcelain Restorations With a Warmed Composite Resin Containing a Rheological Modifier
Placing restorations with this novel technique may help improve marginal fit and adhesion to tooth structure.
Placing restorations with this novel technique may help improve marginal fit and adhesion to tooth structure
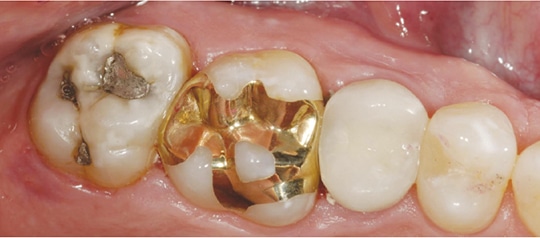
Despite advances in materials and laboratory procedures, cast gold remains the gold standard1 in terms of the fit, finish and longevity of an indirect restoration. Unlike porcelain crowns, porcelain inlays and onlays rely heavily on bonding for optimal success. Marginal gaps cannot be reduced with gold finishing techniques, such as utilized in the Tucker technique (Figure 1).2 Pressed or stacked porcelain restorations fabricated on a traditional die, as well as those milled with computer aided design/computer aided manufacturing (CAD/CAM) technology, can provide excellent marginal fit.3 However, cement margins can ditch and discolor with time.
Light-polymerized resin cements have been shown to have better color stability than dual-polymerized resin cements.4,5 In addition, these light-polymerized cements demonstrate better adhesion to tooth substrate than dual-polymerized resin cements.6,7 Clinical concerns regarding depth of cure related to the porcelain material’s shade, translucency or thickness have been mitigated by high-power, highly efficient LED curing units and utilizing a trans-tooth photopolymerization technique.6,8 It should be noted that the mechanical properties of dual-polymerized resin cements benefit significantly from photopolymerization.
Heating composite resin to reduce its viscosity and improve flow when seating porcelain restorations will increase the conversion of the monomer and reduce the required light exposure for photopolymerization. It will also improve the resin’s mechanical properties and wear resistance.9–11 In contrast to heating, the use of ultrasonic seating devices has demonstrated reduced film thickness and improved marginal fit.12,13 This paper will explore a novel porcelain seating technique using warmed composite resin cement containing a rheological modifier (SonicFill, Kerr). A rheological modifier allows certain gels or fluids that are thick, or viscous, under static conditions to offer improved flow when shaken, agitated, sheared or otherwise stressed. If heated, a resin cement containing a rheological modifier may provide the advantages of heated composite resin regarding polymerization and cure depth, as well as improved marginal fit achieved via improved flow and ultrasonic seating.
TECHNIQUE
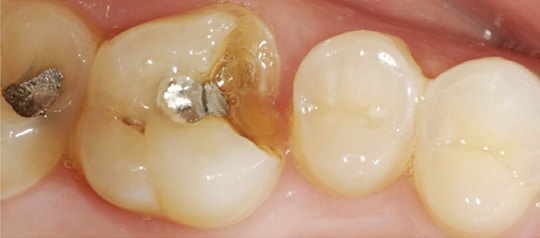
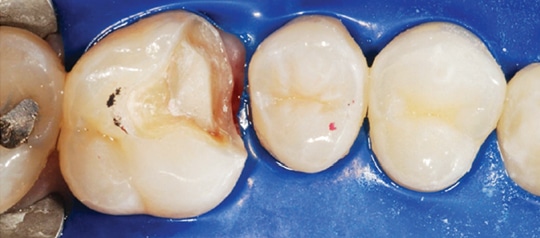
Step 1: Achieve isolation by placing a heavyweight rubber dam and prepare the fractured tooth using diamond burs, according to the standard design for a porcelain onlay (Figure 2 and Figure 3).14
Step 2: Impress the prepared tooth using light-body vinyl polysiloxane and an impression tray. Fabricate a provisional restoration, and cement with a zinc polycarboxylate luting agent.
Step 3: Pour the impression in type IV stone. Next, create a wax pattern and invest using a porcelain pressing investment. Select a lithium disilicate ingot and press (following the manufacturer’s recommendations) in the pressing furnace.
Step 4: Place a rubber dam during the insertion appointment. Remove the provisional restoration and residual polycarboxylate cement with a microetcher and 50-micron aluminum oxide powder. Place polytetrafluoroethylene (PTFE) tape into the sulcus just below the margins to minimize the possibility of composite flowing subgingivally. If soft tissue oozing is encountered, place retraction cord soaked with 25% aluminum chloride prior to placing the PTFE tape.
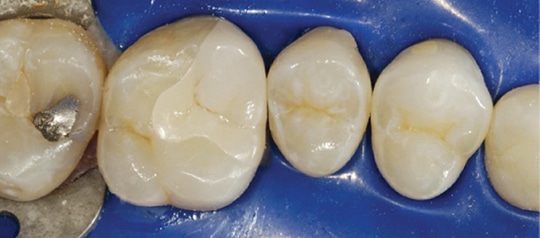
Step 5: Check the fit of the restoration and evaluate the interproximal contacts using waxed floss (Figure 4). Etch the lithium disilicate restoration with 5% hydrofluoric acid for 20 seconds, rinse with water, steam clean, and thoroughly dry. Apply universal primer and allow it to react for 60 seconds (use a stream of air to disperse any excess). Note: This salinization step should not be eliminated when using universal adhesive systems that do not contain silane, as the bond strength of these products will degrade significantly over time.15
Step 6: Etch the enamel only with 35% phosphoric acid for 15 seconds, rinse for 10 seconds and blot dry. Next, apply a two-component self-etch universal adhesive, according to the manufacturer’s recommendations. Apply the primer to the enamel and dentin with a scrubbing motion for 20 seconds, and air thin for 5 seconds. Next, apply adhesive to the enamel and dentin for 15 seconds and air thin for 5 seconds. Cure with an LED curing light for 10 seconds.
Step 7: Apply adhesive to the intaglio surface of the porcelain onlay, air thin, and light polymerize for 10 seconds. Warm a rheological modified composite resin cement in a composite resin warmer to 68º Celsius (this takes approximately 11 minutes). Apply the rheological modified composite resin cement from a unidose tip to the intaglio surface of the restoration using the delivery handpiece. Use the side of an empty unidose tip attached to the activated delivery handpiece to trowel the composite to a thinner, even layer on the intaglio surface and remove any excess from the margins (Figure 5). Attach an adhesive stick applicator and place it in the composite resin warmer (with the cover in place) until ready to insert the restoration. Remove the restoration from the composite resin warmer and bring it into contact with the preparation with the adhesive stick applicator. Use an orange wood stick with moderate pressure to separate the restoration from the adhesive stick applicator.

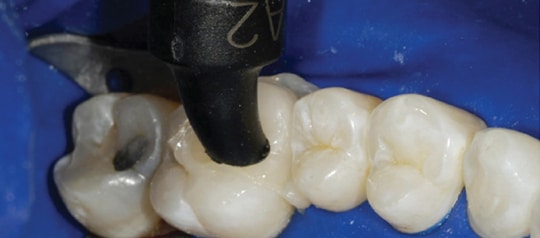
Step 8: Wipe excess composite away with a disposable applicator brush that contains a small coating of adhesive. Attach a modified, empty unidose tip to the delivery handpiece and apply to the restoration’s occlusal surface (Figure 6). Activate the handpiece and use gentle pressure on the occlusal surface of the restoration, directing energy into the internal aspects of the preparation. Excess resin will be expressed from all margins, similar to mortar when seating a brick in a wall. Remove the excess material using a disposable applicator brush with a light coating of adhesive. Repeat activation of the handpiece and place pressure on the restoration to verify complete seating.
Step 9: Floss the contacts, apply glycerin on all margins, and polymerize with an LED curing light. Place the tip of the curing light directly on the restoration to allow for trans-illumination polymerization to the maximum depth possible. Utilizing a trans-tooth photopolymerization technique, polymerize for 40 seconds from multiple angles along all margins. After polymerization, polish the margins lightly with a composite polishing point that will not remove or mar the porcelain (Figure 7).

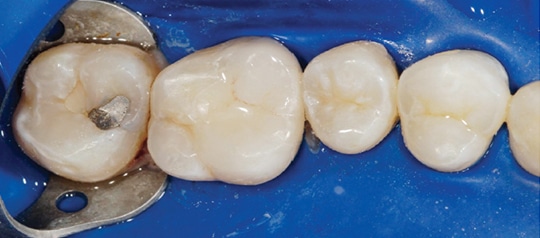
Step 10: Remove the PTFE tape, retraction cord and rubber dam. After verifying that occlusion is satisfactory, remove any residual adhesive resin from teeth or tissue (Figure 8 and Figure 9).

SUMMARY
Inserting a porcelain restoration using a warmed composite resin cement with a rheological modifier has the potential to improve fit due to the increased flow and thinner film thickness of the activated cement. In addition, based on previous studies,4,5 the material’s long-term color stability could be better than that of a dual-polymerized resin cement.
Theoretically, the composite resin cement should have excellent wear resistance and polishability due to the percentage of filler particles and degree of polymerization. Based on the extended working time offered by a photopolymerized resin, some operators may find this technique more user-friendly than other luting procedures. Disadvantages to this seating method include technique sensitivity and the time needed to master it. Another potential concern is the possibility of incomplete polymerization of the entire composite resin if the trans-tooth photopolymerization technique is not performed correctly (or completely).
Although the use of porcelain inlays and onlays satisfies the demand for esthetic restorations, it presents clinical challenges during luting that may compromise color stability and long-term outcomes. The novel seating technique presented here may help address esthetic concerns, while improving marginal fit, wear resistance and adhesion to tooth structure. Based on these attributes, it warrants further evaluation and research.
KEY TAKEAWAYS
- Although the use of porcelain inlays and onlays satisfies the demand for esthetic restorations, it presents clinical challenges during luting that may compromise color stability and long-term outcomes.
- While porcelain inlays and onlays rely heavily on bonding for optimal success, marginal gaps cannot be reduced with gold finishing techniques, such as those utilized in the Tucker technique. In addition, cement margins can ditch and discolor with time.
- Light-polymerized resin cements demonstrate better adhesion to tooth substrate than dual-polymerized resin cements.6,7
- Heating composite resin to reduce its viscosity and improve flow when seating porcelain restorations will increase the conversion of the monomer and also improve the resin’s mechanical properties and wear resistance.9–11
- Inserting a porcelain restoration using a warmed composite resin cement with a rheological modifier also has the potential to improve fit due to the increased flow and thinner film thickness of the activated cement.
- Based on previous studies,4,5 the material’s long-term color stability could also be better than that of a dualpolymerized resin cement.
- Considering the extended working time offered by a photopolymerized resin, some operators may find this technique more user-friendly than other luting methods.
REFERENCES
- Donovan T, Simonsen RJ, Guertin G, Tucker RV. Retrospective clinical evaluation of 1,314 cast gold restorations in service from 1 to 52 years. J Esthet Restor Dent. 2004;16:194–204.
- Hess TA. The Tucker technique: the proximal hollow grind to address a root concavity. Oper Dent. 2014;39:454–459.
- Pradíes G, Zarauz C, Valverde A, Ferreiroa A, Martínez-Rus F. Clinical evaluation comparing the fit of all-ceramic crowns obtained from silicone and digital intraoral impressions based on wavefront sampling technology. J Dent. 2015;43:201–208.
- Kilinc E, Antonson SA, Hardigan PC, Kesercioglu A. Resin cement color stability and its influence on the final shade of all-ceramics. J Dent. 2011;39(Suppl 1):e30–e36.
- Almeida JR, Schmitt GU, Kaizer MR, Boscato N, Moraes RR. Resin-based luting agents and color stability of bonded ceramic veneers. J Prosthet Dent. 2015;114:272–277.
- Kameyama A, Bonroy K, Elsen C, et al. Luting of CAD/CAM ceramic inlays: direct composite versus dual-cure luting cement. Biomed Mater Eng. 2015;25:279–288.
- Sarr M, Mine A, De Munck J, et al. Immediate bonding effectiveness of contemporary composite cements to dentin. Clin Oral Investig. 2010;14:569–577.
- Hamlin NJ, Bailey C, Motyka NC, Vandewalle KS. Effect of tooth-structure thickness on light attenuation and depth of cure. Oper Dent. 2016;41:200–207.
- Sabatini C, Blunck U, Denehy G, Munoz C. Effect of pre-heated composites and flowable liners on class II gingival margin gap formation. Oper Dent. 2010;35:663–671.
- Daronch M, Rueggeberg FA, De Goes MF. Monomer conversion of pre-heated composite. J Dent Res. 2005;84:663–667.
- Lovell LG, Lu H, Elliott JE, Stansbury JW, Bowman CN. The effect of cure rate on the mechanical properties of dental resins. Dent Mater. 2001;17:504–511.
- Peutzfeldt A. Effect of the ultrasonic insertion technique on the seating of composite inlays. Acta Odontol Scand. 1994;52:51–54.
- Schmidlin PR, Zehnder M, Schlup-Mityko C, Göhring TN. Interface evaluation after manual and ultrasonic insertion of standardized class I inlays using composite resin materials of different viscosity. Acta Odontol Scand. 2005;63:205–212.
- Rosenstiel S, Land MF, Fujimoto J. Contemporary Fixed Prosthodontics. 4th ed. St. Louis, Mo: Mosby; 2006.
- Passia N, Lehmann F, Freitag-Wolf S, Kern M. Tensile bond strength of different universal adhesive systems to lithium disilicate ceramic. J Am Dent Assoc. 2015;146:729–734.
The authors have no commercial conflicts of interest to disclose.
Featured Image by MEDIAPHOTOS/VETTA/GETTY IMAGES PLUS
From Decisions in Dentistry. September 2017;3(9):28–31.
